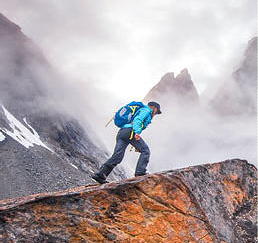
I took these photos while I packed for my next trip. The trip required 8 days of food, a bear canister, wading shoes, near freezing night temperatures, but no tent. I am going to “brave it” with a bivy sack and head net. (More later on what to do if I had to take a tent).
First step is to make a list and lay out the gear. The clothing I wear and trekking poles do not have to go into the pack, however I leave some room in the pack if I want to zip off the legs of my hiking pants. My total pack weight shown in the pack below is 28 pounds. I am not an ultra-light hiker – I take a 10-degree down bag! The bear canister is shown later in the packing sequence. I use a Bear-i-Kade Weekender and for this trip it is full of food.

Clothing and sleeping bag.

Cook gear.

Personal gear and first aid.
Second step is to consolidate and minimize the bulk of what you will have to put in your pack. I use Granite-Gear and REI very light weight compression sacks. This needs to be done without using a lot of stuff sacks – the weight of stuff sacks really adds up. I simply roll up my bivy sack and tie with a cord. The stove, cup and solo pot nest. Whenever possible I try to get the cook pots in the bear canister. This time I could not. Clothes are also good to put in a compression sack. But leave out the rain gear!


Get the air out of the Therm-a-rest and fold up the bivy sack.

Everything ready to put in the pack.
Third step is to get everything in the pack. Even though my pack has lots of outside pockets, I only use them for my water bottle and wading shoes (which are most often wet so I do not want them in the pack). The concept is to get the heavier stuff near your center of gravity (your back) and put the lighter stuff on the outside (farthest from your back). Also, try to keep the side-to-side weight well balanced. Water is heavy, so some people actually take two smaller water bottles and put one in each side pocket.
Sleeping bag 2#14oz. (compression sack inside a very light waterproof stuff sack – or wrap in a garbage bag) goes on the bottom with my sleeping pad (12 oz) on the outside. By "back of pack" I mean the side of the pack that is next to your back. This is probably not a good label! Sorry.

Next, the bear canister (Heavy!!) sits on the sleeping bag. The sleeping pad keeps it snuggly near my back.

Next, stuff items on each side of the bear canister. The bivy (1#6oz) goes on one side with a collapsible water bottle. Gas canister, cup with nested stove, and rain gear on the other side. When I take a tent, I stuff the tent on one side and the fly and poles on the other. With a tent I cannot fit my zip bag of personal stuff in the main compartment – it has to go in the lid pocket.

Now the clothing in the compression sack goes on top. In this case, I had to put the solo pot on the back-side (along with the head net) and this makes the pack look a bit bulging, but after a few days the pot will fit in the bear canister. The pot, although bulky is quite light.

My pack has a zip-compartment on the inside of the lid – here is where I put maps, pencil, and a book if I take one. It also has a key keeper (very nice!).
Now cinch up the main compartment. Be sure to properly attach and use all the compression straps that are available on your pack. Particularly try to get everything cinched down for a low front-to-back profile.

In the lid top pocket, put stuff you will need during the day – lunch, sunscreen, TP etc. Leave a little room for any clothing you may take off during the day. If I expect rain, I will put my rain parka up here. It does not rain a lot in the Sierra, so I usually put my rain parka inside the pack, but easy to get to.
Anything on the outside of the pack is vulnerable to loss. Even though my wading shoes are inside the mesh pockets, I still tie the shoe strings to something solidly attached to the pack. I once ended up in camp after bushwhacking, with one shoe! Also tuck in all the “danglers” – those extra lengths of strings and straps.
The next photos show the pack – front-to-back and side-to-side. It is not the most aesthetic pack I have put together! The solo cook cup makes it look a bit thick at the top and lumpy.


 Previous Topic
 Index
Index


