#200083 - 01/17/1812:36 PMI Made Bamboo Trekking Poles
4evrplan
member
Registered: 01/16/13
Posts: 913
Loc: Nacogdoches, TX, USA
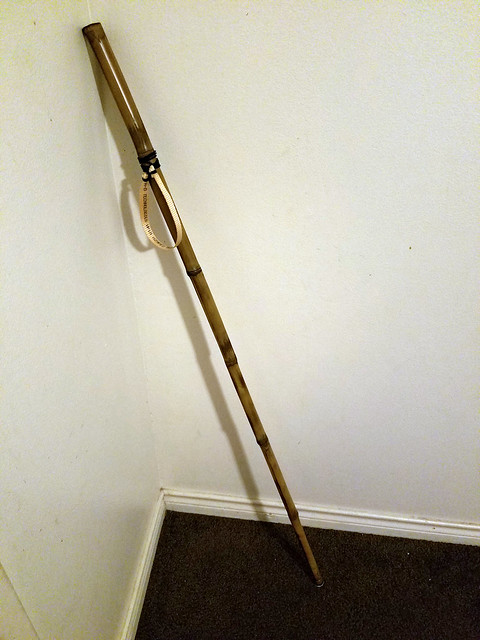
I've got my heart set on hiking Guadalupe Mountains National Park with my oldest son sometime. But, it's steep and rocky, and trekking poles are highly recommended. The closest thing I had was a pair of bamboo canes I cut 2-3 years ago, but they're way overbuilt and heavy, have only tape wrapped around the feet to keep them from splitting, have only tape for handles, and don't have wrist straps. I decided to try again and make a better pair.
I started combing the internet for info about working with bamboo and making trekking poles, and I pieced together a plan from many different sources. I even had an original idea or 2 if you can believe it, which doesn't happen often
SIDE NOTE: I had never considered the type of cane that's native to North America to be true bamboo. Instead, I reserved the word "bamboo" for varieties from the far East and called the local stuff only "cane". I don't know where I got this idea, but in the course of my research, I found out that it is in fact a true variety of bamboo.
Okay, back to the program. I found this video to be the single most helpful source of information. Heat treating the bamboo drives out moisture, making it lighter, and supposedly caramelizes the sugars, bonding the fibers together like fiberglass. There were other ideas I borrowed from other sources, but I don't remember what the sources were.
The first step was to find two straight stalks the right size, as green as possible and do a quick rough cut to the approximate dimensions. I left them a good 8-12 inches long so I could move my grip up when hiking downhill.
I then worked on one at a time so I could experiment with different techniques. I carefully cut the first one down to final dimensions with a small hand saw. I saw a picture online somewhere of a professionally made bamboo cane that had all the nodes sanded smooth. They still curved out organically, but there were no sharp edges on it. I really liked the look of it, so I decided to sand the ridges off of the nodes on mine. I was careful not to sand down too far though, because most of the strength is in the tough outer layers. The further in you go, the softer and less dense it gets.
I then drilled a tiny hole in each section to let steam pressure out and heat treated it over my kitchen stove. I didn't have the technique and pace quite right, so the color turned out uneven. I even burned a couple of spots, but it wasn't too bad. The unsanded parts mostly came out a nice golden/bronze color. Unfortunately the sanded parts didn't match the rest at all.
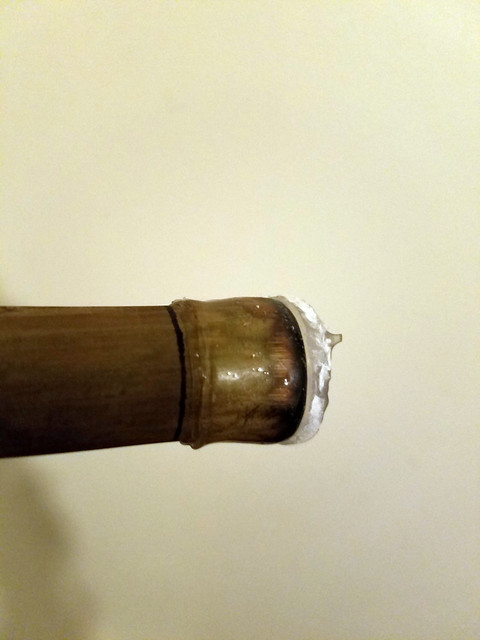
After it sat indoors and dried out for a few days, I started work on the foot. I'd looked at a lot of different commercial options, chair tips, walking cane feet, crutch feet, trekking pole tips, and some of them were fairly inexpensive, but then a light bulb went on. People repair their shoe soles with Shoe Goo, and its cheap and widely available, so why not use Shoe Goo to build up perfectly fitting shoes for my trekking poles? I applied the goo to the shank part of the pole by hand and hung it up to cure. Once it was solid enough to work with, I wrapped a strip of paper around it to make a form for the bottom portion of the foot. I turned the whole thing upside down and poured in enough goo to make it about 1/8 - 1/4 inch thick. Of course, the part of the paper that touched the goo got glued to it, so when I pulled off the form, a bit of the paper ripped off and stayed stuck to the newly formed foot. It looks awful, and the foot itself isn't uniform, but it will hopefully work well, and it's extremely light. I'd had grand ideas of making a nice perfectly shaped form for the entire thing before I got started, but I never did figure out how. Thankfully when the pole is turned upright, the foot is barely noticeable.
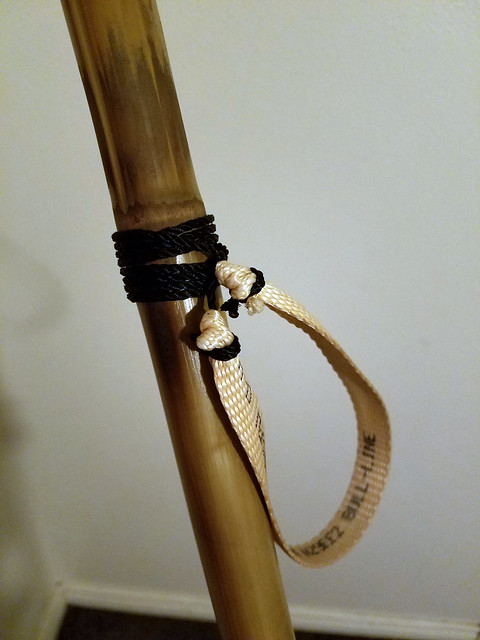
The next step was to work on the handle area. The guy in the video used grip tape IIRC, but I've come to the conclusion from everything I've read about trekking poles, that grips really aren't as important with proper wrist straps. So I decided to forego any kind of wrap and instead focus on wrist straps. I used a loop of cord to make a prussik knot so I could slide it up and down the pole to adjust the wrist strap height. I then cut a short length of mule tape that someone gave me and tied that to the prussik knot. This is the part that goes around your wrist.
The process on the second pole was pretty much the same, except that I decided not to sand down the nodes and I got the heat treating a lot more even. As much as I like the idea of the whole thing being smooth, I'll live with the ridges if it means a more consistent color.
I also decided to weigh it at every step. However, after heat treating, the poles continue to dry out and lose more weight over the course of days and weeks, so it's hard to know how much the feet and wrist straps really weigh. I couldn't just weigh before and after adding the feet and assume the difference was the weight of the feet, because the poles themselves lost weight in the meantime. I'm not at home, and I don't have the weights with me, but I remember the first one came out to 175 grams (6.2 ounces) finished. I'll post the rest of the weights when I have them.
I was really surprised and pleased that it turned out that light, but the second one is over 2 ounces heavier, and I don't know why. There's a few possibilities:
Invisible differences in the bamboo stalks themselves
Sanding the first pole allowed it to dry out more
My uneven heat treat technique on the first pole actually worked better
I feel like the sanding was probably the biggest difference. I want to make another pair for my son, so I'll try sanding down the entire outside surface of one before heat treating and see how the weight turns out.
EDIT: Here are the final weights.
Pole 1 Trimmed:? Heated:179g Shoed:175g Handled:178g
Pole 2 Trimmed:349g Heated:266-234g Shoed:265-234g Handled:235g
The reason for the ranges is that I weighed it on different days as it was drying out.
Edited by 4evrplan (01/17/1809:44 PM)
_________________________
The journey is more important than the destination.
#200084 - 01/17/1804:22 PMRe: I Made Bamboo Trekking Poles
[Re: 4evrplan]
BZH
member
Registered: 01/26/11
Posts: 1189
Loc: Madison, AL
Very cool! I think the darker joints accentuates that they are bamboo and don't look bad at all. Are you thinking about adding grips? You could probably get tennis racket wrap pretty cheap.
When I read the title I was thinking those cheap thin poles you can buy in the gardening section of the hardware store for pennies, but these look nice a strong!
Edit, the only downside I see is that I doubt your tips will last very long. I think the shoe goo will get ripped up every time they strike a rock.
#200085 - 01/17/1804:47 PMRe: I Made Bamboo Trekking Poles
[Re: BZH]
4evrplan
member
Registered: 01/16/13
Posts: 913
Loc: Nacogdoches, TX, USA
Thanks BZH! I won't bother adding grips unless I use them for awhile and think it would really benefit from them. If I decide to add them, tennis racket wrap would be perfect. I am really curious to see how the Shoe Goo holds up. Some testing is in order. I think I see some urban day hiking in my future, maybe this weekend.
_________________________
The journey is more important than the destination.
#200141 - 01/29/1810:54 AMRe: I Made Bamboo Trekking Poles
[Re: 4evrplan]
4evrplan
member
Registered: 01/16/13
Posts: 913
Loc: Nacogdoches, TX, USA
I did a short test hike - maybe 2 or 3 miles, and I have some post-testing thoughts.
Shoe Goo is really tough, but it's too slippery. I don't know how it will wear long term, but it held up well to gravel and strikes against rocks and roots. It doesn't matter though, because at the end of almost every stroke as the pole is more tilted relative to the ground, it's starts to slide out from under you. I may try a more grippy type of rubber like crutch feet. Or, I may try screws to give it a bit of bite.
Getting the wrist straps tweaked just right is fiddly. If the prussik loop is too long, it slips, especially over the smooth bamboo. It holds its place better when the loop is shorter and the strap itself is tied right up close to the pole, but then it's very difficult to get it over the ridges and the knobs where I cut off the branches.
As long as you're using the straps to properly support your arm weight, I don't think grip material is necessary at all. But, even in 3 miles, I started to get a hot spot at the base of my thumb where it rubbed against the pole. Putting a small piece of tape over that part of my thumb would probably alleviate the problem, but there's probably a better solution. Adding grip material would just make it worse becuase of the increased friction.
_________________________
The journey is more important than the destination.
I've got my heart set on hiking Guadalupe Mountains National Park with my oldest son sometime. But, it's steep and rocky, and trekking poles are highly recommended. The closest thing I had was a pair of bamboo canes I cut 2-3 years ago, but they're way overbuilt and heavy, have only tape wrapped around the feet to keep them from splitting, have only tape for handles, and don't have wrist straps. I decided to try again and make a better pair.
I started combing the internet for info about working with bamboo and making trekking poles, and I pieced together a plan from many different sources. I even had an original idea or 2 if you can believe it, which doesn't happen often
SIDE NOTE: I had never considered the type of cane that's native to North America to be true bamboo. Instead, I reserved the word "bamboo" for varieties from the far East and called the local stuff only "cane". I don't know where I got this idea, but in the course of my research, I found out that it is in fact a true variety of bamboo.
Okay, back to the program. I found this video to be the single most helpful source of information. Heat treating the bamboo drives out moisture, making it lighter, and supposedly caramelizes the sugars, bonding the fibers together like fiberglass. There were other ideas I borrowed from other sources, but I don't remember what the sources were.
The first step was to find two straight stalks the right size, as green as possible and do a quick rough cut to the approximate dimensions. I left them a good 8-12 inches long so I could move my grip up when hiking downhill.
I then worked on one at a time so I could experiment with different techniques. I carefully cut the first one down to final dimensions with a small hand saw. I saw a picture online somewhere of a professionally made bamboo cane that had all the nodes sanded smooth. They still curved out organically, but there were no sharp edges on it. I really liked the look of it, so I decided to sand the ridges off of the nodes on mine. I was careful not to sand down too far though, because most of the strength is in the tough outer layers. The further in you go, the softer and less dense it gets.
I then drilled a tiny hole in each section to let steam pressure out and heat treated it over my kitchen stove. I didn't have the technique and pace quite right, so the color turned out uneven. I even burned a couple of spots, but it wasn't too bad. The unsanded parts mostly came out a nice golden/bronze color. Unfortunately the sanded parts didn't match the rest at all.
After it sat indoors and dried out for a few days, I started work on the foot. I'd looked at a lot of different commercial options, chair tips, walking cane feet, crutch feet, trekking pole tips, and some of them were fairly inexpensive, but then a light bulb went on. People repair their shoe soles with Shoe Goo, and its cheap and widely available, so why not use Shoe Goo to build up perfectly fitting shoes for my trekking poles? I applied the goo to the shank part of the pole by hand and hung it up to cure. Once it was solid enough to work with, I wrapped a strip of paper around it to make a form for the bottom portion of the foot. I turned the whole thing upside down and poured in enough goo to make it about 1/8 - 1/4 inch thick. Of course, the part of the paper that touched the goo got glued to it, so when I pulled off the form, a bit of the paper ripped off and stayed stuck to the newly formed foot. It looks awful, and the foot itself isn't uniform, but it will hopefully work well, and it's extremely light. I'd had grand ideas of making a nice perfectly shaped form for the entire thing before I got started, but I never did figure out how. Thankfully when the pole is turned upright, the foot is barely noticeable.
The next step was to work on the handle area. The guy in the video used grip tape IIRC, but I've come to the conclusion from everything I've read about trekking poles, that grips really aren't as important with proper wrist straps. So I decided to forego any kind of wrap and instead focus on wrist straps. I used a loop of cord to make a prussik knot so I could slide it up and down the pole to adjust the wrist strap height. I then cut a short length of mule tape that someone gave me and tied that to the prussik knot. This is the part that goes around your wrist.
The process on the second pole was pretty much the same, except that I decided not to sand down the nodes and I got the heat treating a lot more even. As much as I like the idea of the whole thing being smooth, I'll live with the ridges if it means a more consistent color.
I also decided to weigh it at every step. However, after heat treating, the poles continue to dry out and lose more weight over the course of days and weeks, so it's hard to know how much the feet and wrist straps really weigh. I couldn't just weigh before and after adding the feet and assume the difference was the weight of the feet, because the poles themselves lost weight in the meantime. I'm not at home, and I don't have the weights with me, but I remember the first one came out to 175 grams (6.2 ounces) finished. I'll post the rest of the weights when I have them.
I was really surprised and pleased that it turned out that light, but the second one is over 2 ounces heavier, and I don't know why. There's a few possibilities:
Invisible differences in the bamboo stalks themselves
Sanding the first pole allowed it to dry out more
My uneven heat treat technique on the first pole actually worked better
I feel like the sanding was probably the biggest difference. I want to make another pair for my son, so I'll try sanding down the entire outside surface of one before heat treating and see how the weight turns out.
EDIT: Here are the final weights.
Pole 1 Trimmed:? Heated:179g Shoed:175g Handled:178g
Pole 2 Trimmed:349g Heated:266-234g Shoed:265-234g Handled:235g
The reason for the ranges is that I weighed it on different days as it was drying out.
Interesting, but I am guessing they have a fixed length and cannot be telescoped down for air travel? Hiking sticks have been the last thing on my mind when getting my ultralight kit together, as I normally just find a suitable stick or two to use when I get to the nearest woods out hiking. However, in recent days that has changed because I discovered some commercially made, telescoping hiking sticks, made from red anodised DAC style Aluminium poles, in a shop I visited a few days ago. They collapse down to a length of 65cm (25 1/2 inches)...A bit too long to fit in a cabin sized bag but they would fit into mid sized suitcase diagonally or a normal sized suitcase lengthways no problem. They have proper moulded black plastic hand grips, which can be used in either hand (not just in the left hand or right hand like most hiking sticks), with adjustable length webbing wrists straps, three twist-lock sections, length graduation markings, tungsten tips with optional rubber covers, removable snow baskets and they even have a mini compass in the top of them...The best bit is, they only cost £3.99 ($5.40) each!!! That might even be less than you paid just for the varnish you used to paint your bamboo sticks? I don't know why they are so cheap either, but that's what they cost so I instantly bought a pair. The red colour isn't what I would have chosen, but for that sort of money I think I can learn to live with it! They are heavier than yours though at 292g (10.3oz) each, without the snow basket fitted, but to be honest they still feel very light in my hands. I would prefer a pair with another section to them, so that they could pack down smaller, say into a cabin sized bag for air travel, but they would probably cost at least 20-30 times more. For general use in the UK though they should be fine.
#200987 - 05/15/1811:38 AMRe: I Made Bamboo Trekking Poles
[Re: Alf]
4evrplan
member
Registered: 01/16/13
Posts: 913
Loc: Nacogdoches, TX, USA
Nice find!
There's no varnish on my poles though; the shine is from the natural wax in the bamboo. When you heat treat them, it boils out, and you simply wipe it down with a rag while it's hot to remove the excess wax, along with any dirt that may be stuck to it.
_________________________
The journey is more important than the destination.
There's no varnish on my poles though; the shine is from the natural wax in the bamboo. When you heat treat them, it boils out, and you simply wipe it down with a rag while it's hot to remove the excess wax, along with any dirt that may be stuck to it.
Interesting, I didn't know Bamboo contained wax...How much heat do you need to apply to the bamboo to get the wax to boil out and what is the best way to apply it?...an electric heat gun?
#200995 - 05/16/1801:51 PMRe: I Made Bamboo Trekking Poles
[Re: Alf]
4evrplan
member
Registered: 01/16/13
Posts: 913
Loc: Nacogdoches, TX, USA
Originally Posted By Alf
Interesting, I didn't know Bamboo contained wax...How much heat do you need to apply to the bamboo to get the wax to boil out and what is the best way to apply it?...an electric heat gun?
Most people use a propane torch, but I don't have one. I held it over the flame of my gas stove. It was hard to do this way, because you can't see the effect the heat is having in real time, unless you squat below the stove and look up, I suppose, but that's not practical. You just have to keep it moving and get a feel for how fast to move it. Turn it over every minute or so to see what effect it's having. You use green bamboo, and it turns color as you go. It takes awhile, so be patient. Oh, and WEAR GLOVES! Not only does the bamboo itself get really hot, but steam escapes out of the pressure relief holes and can burn you very quickly.
Edited by 4evrplan (05/16/1801:52 PM)
_________________________
The journey is more important than the destination.
Nice , there're what I use .on the bottom I put The rubber Feet that are used on crutches. I see you got a piece of Moose tape on it as well .that is some strong stuff I use it a lot ridge lines and such.
#202556 - 01/30/1904:55 PMRe: I Made Bamboo Trekking Poles
[Re: Capt hook]
4evrplan
member
Registered: 01/16/13
Posts: 913
Loc: Nacogdoches, TX, USA
Originally Posted By Capt hook
how long did you make these ?
It didn't take that long, except for heat treating them. I held them over my gas stove and worked them slowly back and forth to get the right color. That would have gone a lot faster with a propane torch. I'd say it was about 1/2 to 1 hour per pole to heat treat them.
EDIT: Also, the pull tape is really overkill. I plan to use 1/2" grosgrain for my next pair (in the works).
CORRECTION: My grosgrain is 3/4".
Edited by 4evrplan (01/31/1902:26 PM)
_________________________
The journey is more important than the destination.
#205245 - 02/01/2103:44 PMRe: I Made Bamboo Trekking Poles
[Re: 4evrplan]
4evrplan
member
Registered: 01/16/13
Posts: 913
Loc: Nacogdoches, TX, USA
I just thought I'd give a few updates on these poles, since it's been a few years since I made them.
* Having used these poles on a couple of pretty steep uphill/downhill hikes now, I decided the the adjustable strap is more trouble than it's worth. If you were going to use wrist straps, I'd say put them at the height you'll use most and don't make them adjustable. If you wrap the handles, you have the option of making the wrap long enough to choke up and down as you like.
* The heaviest of the two poles, IIRC, was around 8 oz. Even so, they were a bit overkill. Bamboo is incredible stuff! Since then, I've made a second pair of poles for my oldest kid that were much slimmer. The heaviest of his is around 3 oz! If I were to make another pair for myself, I would want to split the difference and make them just a bit heavier and stronger than the lighter pair, but less than my original pair.
* The lighter pair that I made for my kid has a different style of handle on it. I bought some black drop fishing line, and I wrapped the handle area with that. This is a heavy coated woven line very similar to masons line. In fact, I suspect masons line would work just as well. For how to wrap a handle, look at the way thread is wrapped around fishing poles to attach eyelets. You tuck the loose ends in under the wraps so it can't unravel.
* The lighter pair still used wrist straps, but I used grosgrain ribbon instead of mule tape. It's much lighter and still plenty strong for the job. Instead of attaching it with a prussik like I did on the first pair, the wrist loops go under three turns of the handle wrap.
* On the lighter pair, I also wrapped sewing thread for a half inch or so around the bottom before I coated it with Shoe Goo, for a little more insurance against splitting.
* On the 2nd/lighter pair, I didn't bother trying to make a form for the Shoe Goo feet. I just applied it free form.
* I eventually added 3 small self-tapping hex head screws to the bottom of each of the heavier/original pair of poles to have a little more bite and grip. The lighter pair aren't wide enough 3 screws, but I do plan to add 1, eventually. I have to find my screws first.
* I liked the simpler, non-adjustable, handles on the 2nd pair so much, I'm converting the 1st pair to the same style. It might be a mistake, but I've cut off the extra length as well. I'll just deal with not being able to move my hand up on the down-hills. They're in a limbo state at the moment, since I can't seem to find my line I used for the handle wrap.
_________________________
The journey is more important than the destination.
Those poles look really nice! Do they seem to absorb some of the shock?
I converted some cheap, used ski poles last year and just wrapped the handles with bike grip tape that I already had in the garage. Do you think that something thicker like paracord would stay in place?
I move up and down the grip so frequently, I don't even have straps, but I do like the idea of the prusik if I were to put them on.
4evrplan
member
Registered: 01/16/13
Posts: 913
Loc: Nacogdoches, TX, USA
Originally Posted By DustinV
Those poles look really nice! Do they seem to absorb some of the shock?
Thanks! Because they've got a bit of girth to them, more than they need really, they're harsher than you would expect from bamboo, more so than carbon poles but probably less than aluminum poles. The poles I made for my son are thinner and more flexible, a bit too thin for comfort, but they are extremely light. The heaviest of his pair is around 3 ounces, and yes, they absorb shock nicely.
Originally Posted By DustinV
I converted some cheap, used ski poles last year and just wrapped the handles with bike grip tape that I already had in the garage. Do you think that something thicker like paracord would stay in place?
I remember you working on your ski pole conversion; I think that's really cool! Yes, I definitely think paracord would stay in place if you wrap it right. I wrapped mine the same way fishing rod makers wrap thread to hold eyelets. Both ends of the string end up tucked very tightly under the wraps.
Originally Posted By DustinV
I move up and down the grip so frequently, I don't even have straps, but I do like the idea of the prusik if I were to put them on.
My experience with the prusik attached straps was that they were either too tight to adjust easily, or they slipped in use. The smooth surface of the bamboo and the knobs that flare out between sections make this challenging. Furthermore, the prusiks added extra space between the attachment point and the hand position, so you have to attach them higher. I never tried using a prusik over wraps, just the bare bamboo. They might hold better over the wraps. I hope you try it and report back. There's not really anything to lose, since they are easily removed.
_________________________
The journey is more important than the destination.
4evrplan
member
Registered: 01/16/13
Posts: 913
Loc: Nacogdoches, TX, USA
Originally Posted By hasen akoy
Everything depends on its elasticity. high elasticity can give more performance time
I'm not sure I understand what you mean. By elasticity, do you mean how flexible or rigid the trekking pole is? Are you saying the more flexible they are the longer they will last? Or, are you saying the more flexible they are the more pleasant they will be to use?
_________________________
The journey is more important than the destination.
Our long-time Sponsor, BackcountryGear.com - The leading source for ultralite/lightweight outdoor gear:
Affiliate Disclaimer: This forum is an affiliate of BackcountryGear.com, Amazon.com, R.E.I. and others. The product links herein are linked to their sites. If you follow these links to make a purchase, we may get a small commission. This is our only source of support for these forums. Thanks.!


 Previous Topic
 Index
Index


