Best viewed in 800x600 or higher
Updated 2000OCT02
Rules:
These instructions are for intelligent and careful ADULTS, if you don't
fit into ALL of the previous categories DO NOT attempt this
project -- You assume all legal, moral, financial and medical responsibility
should you attempt this project.
Wear Work Gloves AND Safety Glasses while making this stove, you will
be working with very sharp edges
Use the stove outdoors with a 5 gallon bucket of water or garden hose
and a fire extinguisher to put out any unexpected fires.
Keep away from children! Sharp edges, fire and poison are not
for little ones.
Use only outdoors, in a safe large fire pit area, never in a drought fire hazard situation.
This stove will run on 70% Isopropyl Alcohol, this is the only fuel
I have tested it on.
DO NOT use of anything else!
If you get alminum hot enough it will actually burn, so please don't
use any other fuels.
Okay, now that my lawyer is happy, let's get down to business.
Very sorry my camera does not take good pictures, it is on my birthday list.
This project will take about 20 minutes to do, mostly to gather the tools.
The stove will weigh less than 10 grams, ~1/3 of an ounce. Using about 1 ounce of 70% Isopropyl Alcohol it will boil a pint (500 ml) of water in about 6.5 minutes. (At sea level.)
I hope you only need to use this stove for recreational purposes.
Please enjoy this project wisely,
Fuzzy
Mail questions or comments to: stove@ofuzzy1.com
History:

Supplies & Tools:
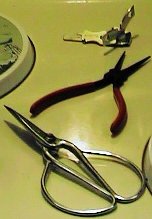
Work Gloves
Safety Glasses
A 12 oz soda can
A clean used tuna can - 6 ounce can
News paper for a quick cleanup
Can opener
Needle nose pliers
Sharp heavy duty scissors -- not your wife's sewing scissors.
A nail or screw or ice pick - to poke some holes
Sand paper or a metal file
Magic Marker (permanent marker)
Ruler
Instructions - assembly:

- Remember if you mess up you will have to drink another soda! :))
- Spread out the newspaper on the work surface, to catch the metal cuttings.
- Put on and Wear Work Gloves
- Put on and Safety Glasses
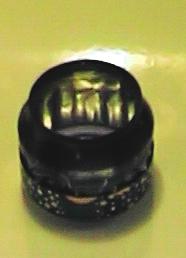
- Take the scissors or nail or ice pick and poke 4 SMALL holes in the upper lip as shown. Spaced every 90 degrees. This allows the fuel to flow evenly while burning.
- Use the can opener and remove the inside top where the mouth is - keeping the thick rim, this is not easy. Some lifting of the can opener and pushing will be needed while turning to get the gear teeth to move along.
- Using the needle nose pliers rub & crush any burrs made by the can opener and or the ice pick / nail.
- Draw a circle around the can about 1" (25 mm) up from the bottom and another circle 2" (50 mm) down from the top.
- Cut the can open between the middle of these two lines be very careful the edges will be very sharp! It is okay if it is messy you will clean up these in the next two steps.
- Cut the bottom half on the line, use this one for your practice. Cut a nice clean edge, no nicks or slivers to injure yourself on - this does not need to be level, just very smooth.
- Take the top half and cut on the line, Again make sure you have no nicks or slivers -- the straighter the better, this is affects the leveling of the cooking pot.
- Using the file or sand paper smooth ALL edges and burrs.
- Using the needle nose pliers gently wrinkle the "rinkle to here" line you want to twist the pliers to make a ruffle in the edge of the can, you want the ruffles / wrinkles but not to big or wide. Make 6 to 10 wrinkles.
- Or use a rounded piece of lumber and gently dent in some grooves - be careful not to tear the metal.
- Make the can stronger to support the pot.
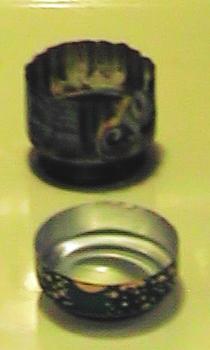
- Allow the top half to slide into the bottom half.
- Allow the vapors to escape up the side and act as flame jets.
- Carefully insert the upper portion into the lower portion.
- These will do several things:
You're done with the building portion.
This little stove weighs less than 10 grams, ~1/3 of an ounce!
Theory of operation: (Oh, no not
some boring prattling)
Well, too bad. When you make something you should have a clue how it
works. This won't hurt too much.
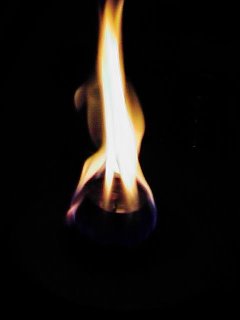
The fuel (70% Isopropyl Alcohol) is poured into the center and ignited. The flame inside the chamber causes the top half to heat up, when the outside edge is hot enough the fuel starts to vaporize and mists out the sides (because of the wrinkles / ruffles). This vapor is then ignited by the flame from the center flame -- all of this happens in about 30 seconds or less.
See was that bad?
Instructions - use:
- DO ONLY OUTDOORS (outside) and have a fire extinguisher ready! And 5 gallon bucket of water or garden hose.
- Place the stove on solid level ground
- The fuel (70% Isopropyl Alcohol) is poured into the center fill to just above the top can's bottom lip and well below the lower cans upper edge (on the outside).
- Ignite using a long match or long tipped lighter for barbecues.
- Wait about 30 seconds, for the outside edge to start flaming.
- Place pot carefully centered on the stove.
- DO NOT plan to stir your pot on this stove, you will need to make a support for your pot. That is an exercise left for the student :)) -- I've always wanted to say that. Hint: take a big tin / metal can and cut out the top and bottom and cut notches into it. See photo below for a nice example - triangle notches will do.
- Extinguishing the flame, you can not blow out the flame unless the pot is on top then a strong breath will do it. Or use a tuna can dropped upside down on to the stove.
Evolution of designs:
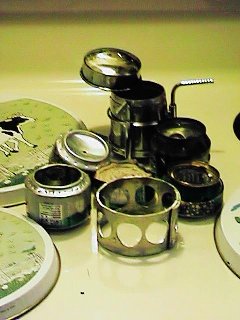
- Starting from the Simmons Stove, I tried to copy it.
- With two cans cut and an insert placed in the middle to act a vapor guide.
- A cotton wick and burner top -- that one literaly blew it's top.
- A shorter version of the above stove, it needed the support ring to allow a pot to cook, it was to short for the flame to develop and would quickly die out if used without the support ring.
- The version above but without the four vent holes, it would sputter, pop and hiss as it cooked.
- A taller version would not stay ignited long enough to heat up and burn properly. The flame did not get enough oxygen.
Return to: [ Top of This Page ] [ Make Your Own Gear Page
]