The Hunters
Lean-To
How To Make a "Whelen" Tent
by Steve Smith, 3/5/04
Early in the
twentieth century, Colonel Townsend Whelen, noted hunter and outdoor writer, designed a tent he called the "hunter's
lean-to". Colonel Whelen was a
minimalist. He desired to be as close to
his natural surroundings as was possible.
He generally considered anything short of -20 degrees or severe bugs
hardly worth using a shelter at all.
Soon after its design in 1925, Abercrombie & Fitch manufactured the
style and marketed it as the "Whelen Lean-to"; essentially a lean-to
with side walls. Originally, this tent was made of a relatively specialized
tarp. Today it can only be found in
outdoor specialty shops for $150 - $300.
Attached are plans that will help you to make your own Whelen
lean-to. Made of .6
mil Visquene plastic sheeting, it is light and
easy to pack. It also has the advantage
of being heated by an open fire. In
addition to being inexpensive to make, it is durable, spark resistant and can
be patched using duct tape.
Materials
·
12' x 20 foot sheet of .6 mil clear poly film.
·
26 3/8 inch grommets
·
Duct tape
Tools
·
Scissors
·
Tape measure
·
Hammer
·
Grommet tool
·
Felt marker
Instructions
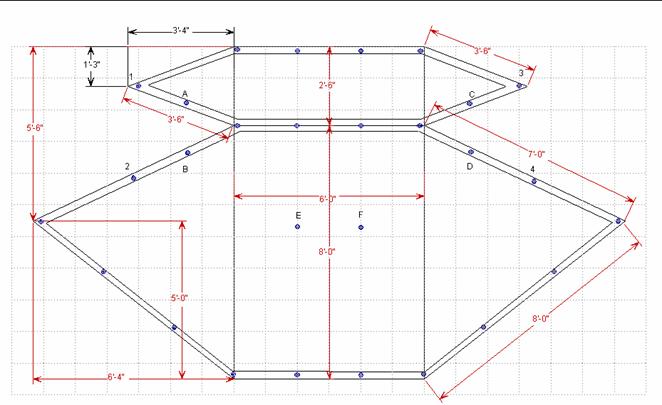
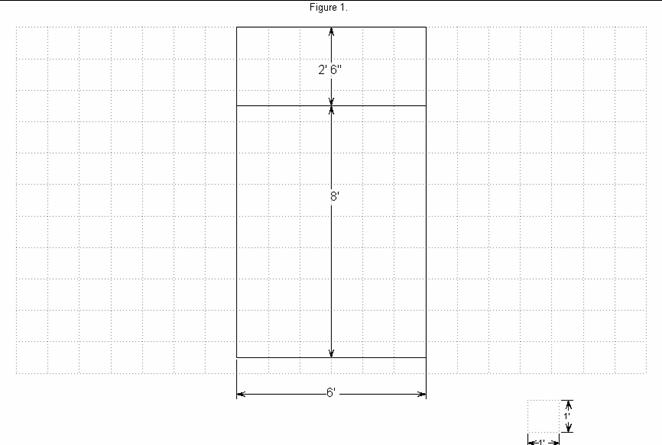
Lay the plastic out flat on a smooth surface such as a patio or driveway. On the long side (20') measure seven foot (7') from the left corner to find the left starting corner. From the starting point, mark two squares; the first one six foot by two and a half foot (6' x 2 1/2'), and an adjoing square, six foot by eight foot (6' x 8') See figure 1.
From the left
starting corner, measure to the left, six foot four inches (6' 4") then
down five foot six inches (5' 6") and place a mark for the large left
wing. From the right starting repeat the
process to place a mark for the large right wing. This point should be approximately five foot
(5') from a line drawn perpendicular to the bottom of the large square on
either side. From the corners of the
large square, measure to the wing marks.
The bottom edge of the wings should be approximately eight foot (8')
while the top edge of the wings should be approximately seven foot (7'). When you have located the proper location,
mark the large wings. See figure 2.
From the left starting corner, measure to the
left, three foot four inches (3' 4") then down one foot three inches (1'
3") and place a mark for the small left wing. From the right starting
repeat the process to place a mark for the small right wing. This point should
be approximately one foot three inches (1' 3") from a line drawn
perpendicular to the bottom of the small square on either side. From the
corners of the large square, measure to the wing marks. Both edges of the small wings should be
approximately three foot six inches long (3' 6"). When you have located
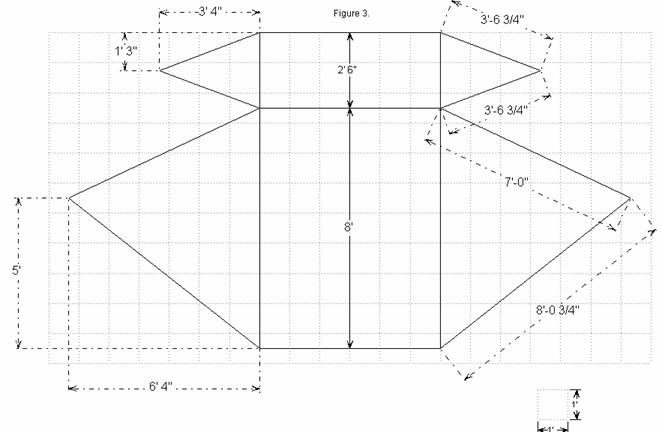
the proper location, mark the small wings. See figure 3.
Reinforce the edges
all around with duct tape. Locate the
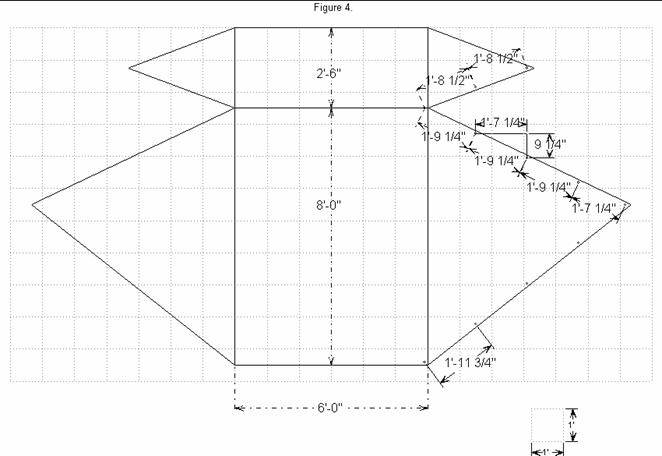
grommet locations as indicated in figure 4.
Add an additional layer of duct tape to reinforce the grommet location. Using a grommet tool install 3/8" grommets where
indicated. Be sure and line up the
grommets as indicated
at location 1-2, 3-4 and A-B, C-D so that these flaps may be tied
together if so desired. Two additional
grommets may be place at E and F to provide a location for additional loops. This however will compromise the ability of
the Whelen to turn water. See figure 4.
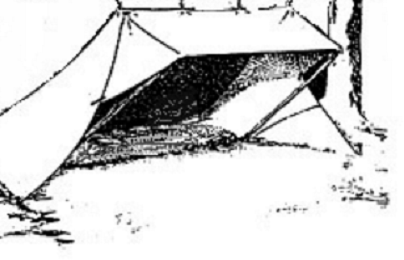
The Whelen may be
pitched with a ridge pole or strung between two trees attached to loops attached to the
ridge line of the tent. See top picture.