|
www.TrailGear.org |
The last
trail stove you'll ever need! Backpackers, Hikers, Campers and Survivalists
are discovering this light weight, powerful, compact camping stove.
Possibly the smallest wood buring stove you'll ever build. At
nearly 4 inches Wide x 7 inches High (smaller than a shoe) and weighing
only 5 ounces this is the ultimate backpacking trail stove!!!
This powerful little stove can boil 2 cups of water within 7 minutes and runs on burnable solid fuels like paper, dried leaves & grass, twigs, wood, even pine cones. No need to carry gas stoves or heavy propane bottles when you're on the trail. Let nature supply you with fuel, just use any dried twigs or wood you find laying around.
TOOLS &
MATERIALS:
Safety
glasses. One 46 fluid ounce (1 qt 14 oz) can of Tomato Juice or same size
aluminum can. Actual size of the stove is 4-3/16" W x 6-15/16" H.
Cost - Less than $1.50. Note: The air intake holes can also be made by drilling five 1/2" holes
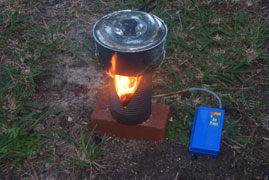
using a Uni-bit. Tip: Buy a battery powered air pump used for fishing to
keep bait fish alive. Connect the end of the tube you blow air
through to the output of the pump. When you need to stoke the fire,
just turn on the air pump. Note: To avoid the plastic tube from
melting, make the copper tube inserted in the air intake hole on the stove
about 5 inches long. The plastic tube connecting the 5 inch copper tube to
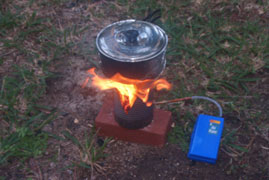
the air pump should be about 4 inches long. Here's an example of an
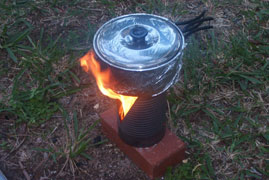
air pump stoking the fire ... To start the stove ...
1) Place the stove on a safe, flat noncombustible surface.
Place the stove with the air intake holes facing into the wind and
the large exhaust hole facing away from the wind. IMPORTANT: With this stove less is more. In other
words this stove does not need a lot of wood to burn efficiently. If
there's too much wood in the stove you'll get a lot of smoke, this is not
good. You should only add enough wood so the flames are exiting the
exhaust hole with little or no smoke expelled.
Problem: Too much smoke Problem: Fire is dying out After a few test runs you'll get the hang of the proper balance between
wood and air needed to produce a good cooking fire.
Center punch or Drill with drill bit.
Can opener.
Bottle
opener (church key).
Metal file.
Tin snips or Dremel tool with
cutting wheel.
Build time - 15 minutes.
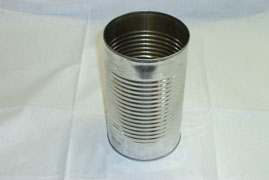
STEP 1. PUT ON YOUR SAFETY GLASSES!!!. Always
use eye protection when working with metal. Take your can of tomato
juice, remove the label and cut the top out with your can opener. 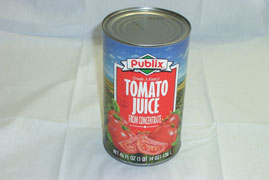
STEP 2. Start the exhaust hole. Draw a triangle
just below the top rim 4 inches wide by 4 1/2 inches long. For
best performance - do not alter these measurements. Also, use
your center punch or drill to make starter holes inside each of the three
corners of the triangle. 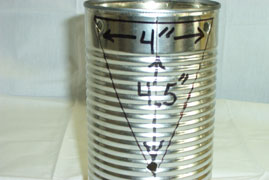
STEP 3. Make the exhaust hole. Using your tin
snips or dremel tool cut out the triangle. For best results use a
dremel tool with a cutting wheel. 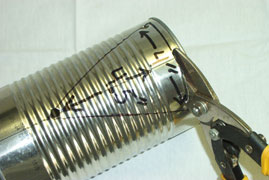
STEP 4. Using your metal file or dremel tool remove
any burrs or jagged edges. Note: To avoid injury, be careful
handling the stove after the holes are cut out. 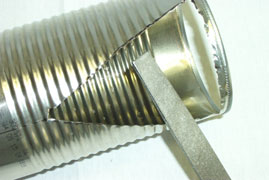
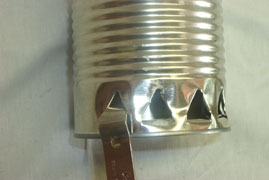
STEP 5. Make the air intake holes. Spin the can
around 180 degrees. On the back and bottom of the can, directly
opposite the exhaust hole, puncture a hole using your bottle opener.
Then puncture 2 more holes on each side of the center hole you just
created. There will be a total of 5 air intake holes on the back and
bottom of the can. Note: the air intake holes must be on the bottom
of the can, directly opposite the triangle exhaust hole.
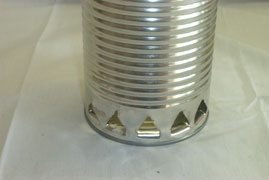
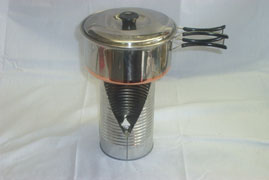
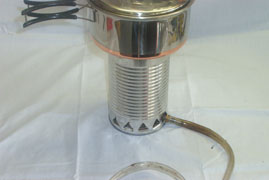
STEP 6. Finished wood burning trail stove.
Exhaust hole in the front with 5 air intake holes on the back and
bottom of the can. 
STEP 7. It's a good idea to make a stoking tube to
stoke the fire. It's made out of any small diameter plastic tubbing
about 3 feet long with a metal or copper tip inserted in one end.
The end with the metal tip is inserted into one of the air intake holes on
the back of the stove, the other end you'll blow air through using your
mouth. This will increase the air flow in the stove (stoking the
fire), making the flames larger and the fire burn hotter. Always
keep all body parts and clothes away from the stove when stoking.
Note: Remove the stoking tube from the air intake after finishing
each stoking. 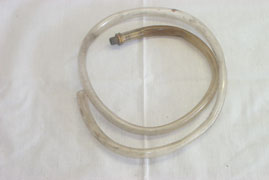
HOW TO USE THE STOVE:
2) Place paper
or dried grass or any other small item that can easily ignite, through the
top opening into the bottom of the stove. Follow by adding a few
small pieces of dry twigs and wood.
3) Light the stove through
the air intake holes on the back and bottom of the stove. For Safety
- keep all body parts and clothes away from the stove at all times.
4)
As the fire grows add more pieces of dry wood starting with smaller twigs
followed by larger pieces of wood.
5) Use the stoking tube to help the
fire grow.
6) When the fire is going good, place your cooking pot on
the top of the stove.
7) Add additional fuel through the exhaust hole
or through the top opening.
EXTINGUISH THE FIRE:
Let it burn out on its own - OR -
simply pour water, sand or dirt on the fire until it's extinguished.
TIPS:
1) This stove is designed for use "only"
with small backpacking cooking pots!!!
2) Always keep the handle
of the cooking pot away from the exhaust hole.
3) Keep all body
parts and clothes away from the stove. To avoid flare ups, always remove
the cooking pot slowly from the stove.
4) Always remove the
cooking pot from the stove when stirring its contents.
5) For
easy cleanup spray non-stick cooking spray on the bottom and sides of the
cooking pot - OR - wrap the cooking pot with aluminum foil. This
keeps the soot to a minimum.
6) Place the trail stove in a
plastic bag for packing and storage.
PROBLEMS AND SOLUTIONS:
Solution: Too much wood in the
stove - OR - the wood is wet. Use only dry wood and increase the air
flow in the stove. Remove the cooking pot from the top of the stove and/or
stoke the fire. Replace the cooking pot after the fire grows.
Solution: Add more wood and
stoke the fire.
DISCLAIMER:
Use common sense and safety at all times
when using any stove. The author of this web page will not be
responsible for any injury or damage resulting from constructing or use of
this stove design. If you choose to build, use or experiment with
this design, do so at your own risk.
I also have an excellent alcohol trail stove, check out my ... 4 in 1 Cat Stove
Send the author an e-mail jfalk555@yahoo.com
Copyright © - All rights
reserved.