

Closeup of burner

Materials:
four 12 pop cans
Aluminum Rivet - 3/16" dia. body
~3" dia. tuna can (for priming cup/base)
Aluminum flashing (for windscreen)
Burner:
Closeup
of burner
The burner afire (burns hotter with pot above it)
The burner is basically the Convex Top Coke Stove. The only addition is that of a filler hole in the center of the top of the burner and a rivet for a plug. The base pop can is cut 1-1/4" tall and the top plate is the bottom of another can cut so as to leave about 1/8" of straight side-wall. The top plate has 18 holes made with a #76 drill (hint: use a pin vise and leave only 1/4" of the bit exposed). They are angled outward at about a 45 deg. angle. The holes were deburred and chamfered a tad with a 1/16" or so drill bit. A 3/16" hole was drilled in the center for the rivet/filler plug. The hole was deburred and then depressed downward with the rivet in place to intent the top so the bottlom of the rivet makes a good seal. It also allows the simmering gizmo to fit tight. Make the priming cup/base from the bottom 3/8" of a 3" diameter tuna can.
Sand the mating edges of the two burner pieces and coat them with a small amount of J-B Weld epoxy (part # 8265-S). Push the upper plate into the base peice so it's top edge is about 1/16" or so below the top of the base peice. Epoxy the burner to the the priming cup/base. Let the epoxy set for 6 hours then put into a 250 degF oven for 3-4 hours to finish curing the epoxy. The burner can be epoxied to the priming cup/base.
WindScreen:
This was cut from aluminum flashing and sized so it's about
3/4" bigger in OD that the pot. Several 3/8" holes were drilled in the
bottom edge for air for the burner. (To make nice holes, clamp the
flashing between two pieces of wood and drill the holes through the wood.
A brad point bit works best.) : Four holes were drilled for the
steel pot support rods. About 1/4" of each of the short ends are folded
back to allow a paper clip to clamp the sides together. It was then rolled
over a piece of pipe to form a cylinder Here's a drawing: 
For packing,
the paper clip is removed, it's rolled a bit and stuffed inside the pot.
The FIller and Bottle:
A short lenght of 3/16" OD brass tubing was fitted into the
end of a small funnel for filling the stove. The bottle is a 4 oz.
flip-top squeeze bottle some soap stuff came in. Instead of measuring fuel
in a separate cup for filling, mark graduations on the side of the bottle.
To fill the burner with a given amount, invert bottle over funnel (not much fuel
flows out) and note the fuel level. Squeeze and release the bottle to
dispense some fuel then note the lesser level in the bottle. Repeat until
the desired amount of fuel has been dispensed.
Simmering Gizmo: 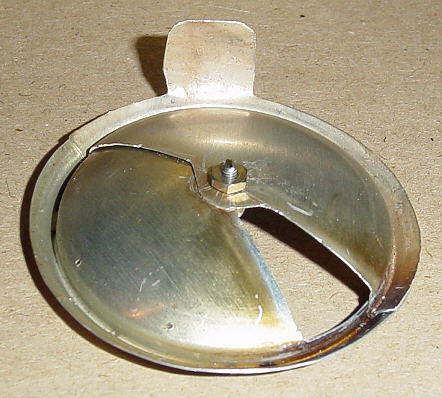

I
experimented alot since the burner puts out way too much heat for
simmering. The thing was made from the bottoms of two more pop cans.
The openings in them were cut with a Dremel MotoTool- both pieces have 180
degrees openings.. A 2-56 screw and nut holds the pieces together.
The two are rotated with respect to each other to adjust the opening size.
Making the opening larger increases the heat. A bit of silicone keg lube
between the two pieces allows them to slide over one another easily.
Lighting:
Use only denatured alcohol (methonol)! Fill the
burner and put the rivet in the fuel hole. Put 10-20 drops of fuel inside the
base. The amount of priming fuel depends on temperature and amount of fuel in
the burner. Tilt and rotate the base a bit to distribute the fuel evenly.
Light the fuel in the base. In 10 seconds or so the jets will
ignite. If you put in too much priming fuel, it'll really roar until the
priming fuel is consummed. Once the jets are stable, put the windscreen
with pot supports in place over the burner and place pot inside. For a
thrill, jossel the burner a bit while it's burning- it really flares up.
Performance:
Most of my hot meals require a maximum of 2 cups of water,
so that's what I tested the thing with:
With:Boil was reached in 5.5 minutes minutes and a pretty hard simmer was maintained for another 9 minutes with the simmer gizmo attached.
2 cups of 62 degF water
1 oz of denatured alcohol
53 degF ambient temp.
Safety:
Here's a MSDS for the
alcohol. Breathing the vapors is not healthly, but the stove burns very
cleanly.