|
Reasons for Making my Own Backpack: The reasons I finally ended up making my own homemade backpack stemmed from my desire to enjoy the backpacking experience more and the desire to lighten my load. In the past I followed the advice of other backpackers in order to lighten my load, but I never thought about making my own one pound homemade backpack until I read a small article on the Lightweight Backpacker's website. The article focused on the three big items (backpack, sleeping bag and tent) instead of all the many small items we have in our packs. After reading "The Pacific Trail Hiker's Handbook" by Ray Jardine, viewing Lynne Whelden's video "Lightweight Backpacking Secrets Revealed", reading multiple articles on the Internet, and searching through archives of several mailing lists such as the AT-L at at-l@backcountry.net and the BackpackingLight Yahoo Group at BackpackingLight@yahoogroups.com I was convinced that making my own backpack was indeed possible! Anatomy of Design: I literally spent several weeks just thinking about the design. The first thing I did was to gather most of my traditional backpacking gear and place it all into a cardboard box to determine the target volume needed. I even placed some laundry in a stuff sack to represent the volume taken up by food and water. Leveling out the top as best I could, I measured the width and length of the box and the depth of the gear. Multiplying these three dimensions together (12"x14"x18"=3024 cu in) I came up with a rough volume estimate of 3000 cu in. Please note that this was the volume estimate of most of my traditional backpacking gear, not the lightweight gear I use today. The actual volume of the finished pack is probably closer to 2500 cu in, not including the expanding side pockets or the mesh bag. It's safe say that if you can NOT get your volume of gear under 3000 cu in, then you should consider either a different backpack design or different gear. The next thing I did was to try to figure out the width and length I would need for the bottom of the rucksack design. My original plan was to use a regular Therm-A-Rest sleeping pad wrapped around the inside of the rucksack to provide a frame sheet. My Eureka Backcountry tent (later changed to a Eureka Zephyr) was the biggest stuff sack and would be shoved down inside the Therm-A-Rest pad to the bottom of the rucksack. I wrapped the Therm-A-Rest around the tent stuff sack and took the dimensions. I came up with 7"x15". Later I changed my sleeping pad to a Z-Rest pad (foldable type, 8 sections) which was folded in half to provide a frame sheet and changed my tent to a Eureka Zephyr. If I had realized this pad change then I would have designed the width of the pack to be closer to 13 inches rather than the 15 inches in this design. Regardless of what could have been foreseen, the 15 inch width does function rather well with a pack belt to compress it.
With these two dimensions for the width and length I took some clothing boxes that I had laying around from the holidays, cut them up, and stapled and taped the pieces together to get an idea of what the rucksack would look like. From these pieces I drew up the basic dimensions for the rucksack. The overall length of the rucksack, not including the hood section, was an estimate from several measurements of my back as well as measurements from my old Gregory Shasta internal frame backpack. The drawing above was my actual sketch of the pieces needed for the rucksack. It does not include the pockets or the extension hood. More about these part later. Please note that the rough sketch above DOES NOT INCLUDE the additional material needed for stitching allowances! Sorry about the rough sketches, I didn't have the time to draw up any fancy diagrams. Instead, I'll try to show as many photos as possible. Materials: All the materials for the rucksack were purchased from a local supplier in Florida. Quest Outfitters
Quest Outfitters supplied me with good customer service and good fast delivery. The only negative was that they had to add sales tax because I lived in the same state. I spent much time debating on materials to use. I finally decided to use: (#1044) Cordura
- 330 denier (4 oz. per sq. yd.), Black -- for the Bottom and Back
The Cordura was used for the bottom and the back side of the pack. These sections would have to be able to take much "wear and tear". The 2.2 oz. Ripstop nylon was used instead of the very lightweight 1.1 oz. Ripstop. Even though people have been successful in making backpacks with the 1.1 oz. Ripstop, I felt that the material was a little too thin for my style of backpack. I also opted against the use of any mesh or netting material in the backpack, except for a mesh pocket hanging off the front of the pack for drying cloths. The side pockets were made completely from 2.2 oz. Ripstop nylon. I felt that mesh pockets would inevitably become torn or ripped by vegetation in thick dense sections of trail. I will try to list most of the materials used and the approximate quantities used to make my backpack. I ordered materials from Quest Outfitters about three times during the construction process, which unfortunately was the design process at the same time. You'll probably be able to order less material if you measure, calculate and layout things prior to construction.
I also bought an eyelet kit and brass eyelets from a local supplier as well as Camp Trails shoulder straps to be used with this backpack. More about the shoulder straps later. Construction: I started by cutting all the basic pieces, adding about 1/2" for stitching. I laid all the pieces out and measured everything multiple times. I knew absolutely nothing about sewing when I started on this project, but I decided to just dive in. One of my friends had to show me how to setup the sewing machine, which was one of the hardest parts for me. I practiced on a couple of small pieces, playing with all the zigzag and length adjustments. I decided to triple stitch everything, two straight stitches with one overlapping zipzag stitch. I also over-stitched the ends about an inch or two to prevent unraveling. It made for a very solid construction. One of the hardest things for me to remember was that I was making the sack while it was inside-out. I had to cut out a stitch or two because I forgot about this and had the wrong side of the material to the outside. In most cases you want the shinny coated material surface to the inside.
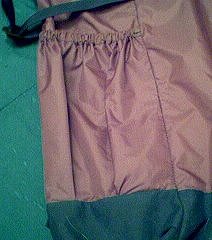
Side Pockets: When I felt comfortable
with the sewing machine I decided to start on the side pockets of the pack.
This was one of the more difficult parts, so I looked at my Gregory Shasta
pack for ideas. The picture to the right shows the pockets completed. You'll
need to cut some pieces of Ripstop nylon that are about 3" wider than the
sides to allow for expansion. Also, don't forget to allow for the tunnel
for the elastic at the top. To sum it up, the width should be about 7"
(side width) + 1" (for stitches) + 3" (for expansion) = 11" and the length
should be about 10" (desired pocket length) + 2" (for elastic tunnel) +
1/2" (for stitch) = 12 1/2". The key here is to use a fold at the bottom
of the pocket and a free moving elastic tunnel at the top. The elastic
has to be stretched some and stitched at the ends only. The folds at the
bottom will allow the pocket Corner Pieces:
Attaching the Front and Back: The next thing to do is to stitch the back piece (Cordura) to the front piece (Ripstop nylon). Make sure the stitch will be on the inside on the pack! Remember that you'll be stitching this inside out, so the pockets go towards the inside. Also, you want the dull treated surfaces of the materials facing you so they end up on the inside of the pack. At this point you should have 3 pieces in front of you (2 sides pieces and the front and back piece). Connecting these parts can be difficult. Start at the corners and work your way out. I would suggest pinning up each side, one at a time. Make sure to line up the Cordura so it matches up with the corners. Don't worry if the top isn't exactly lined up, you can trim the top of the sack later. Also, remember that you want to be working with the pack turned inside out! You want the stitches to end up on the inside of the pack. Other things to add during these stitches would be the compression straps. I did not add compression straps until later in my project, but I would highly recommend adding them to the stitch now! They are a must to compress the load, which is the key to this kind of pack! Cut yourself 4 pieces of the 3/4" nylon webbing. These pieces will be used to connect the ladderlocks to the pack. Leave about 1" to the inside of the pack for stitching. Remember which side is the inside and which is the outside; you're working with the pack inside out! Place two of the pieces about an inch above the pockets and the other two pieces about 2" from the top of the sack. Make sure to use long pieces of nylon webbing near the pockets. You don't want to the ladderlocks right above the pocket or they will get in the way every time you put something in the pocket. You can always trim the straps later. You'll also want to consider adding the nylon webbing for the ends of the shoulder straps. I would make these two straps about 16 inches long using 1" nylon webbing. You can always trim them later. Attach them where the corner piece meets the bottom of the side pocket. I decided to do many of these things later because I had enough to think about at this point. It's better to add any attachment loops or other webbing straps now. Adding the Hood: After you successfully attach the sides, front and back you will have yourself the basic pack sitting in front of you. Trim up the top of the sack so it is level if you haven't already. Adding a hood is one of the more simple parts. The hood section I made was about 10" in height completed, which was sufficient for me. You might want to make a 12" or even a 15" hood, but just remember that if you make the pack bigger you will most likely fill it with more gear! When measuring this piece make sure to add some material for the draw string tunnel and the stitches. The hood has a draw string tunnel sewn into the top with a brass eyelet punched in. Working the draw string through the tunnel can take some time, just be patient. Shoulder Straps: Originally, I ordered enough material to try to make my own shoulder straps. My first attempt failed, so I followed the advice of other fellow backpacker's and bought some Camp Trails shoulder straps from Campmor. At first they seemed like the perfect solution to my problem, but after my first weekend backpacking trip I realized that they were too long as well as too wide for my shoulders. After a little
contemplating on what to do, I decided to completely cut apart the Camp
Trails shoulder straps and modify them to my needs. I already had all the
materials I needed in the existing straps. I carefully trimmed off about
4 inches in length, trimmed 1/2 inch in width from the padding material
and shortened the webbing. After trimming the nylon and stitching it back
together, I soaped up the padding and slid in back into the nylon sleeve.
Stitching the nylon webbing back into the padding proved to be a challenge,
but after breaking a needle or two it was completed. The result was a lightweight
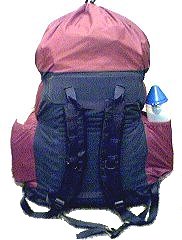
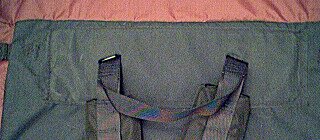
shoulder strap that fits my pack and me much better. Shoulder Strap Attachment Reinforcement: This is another
one of those areas in which I spent much time just thinking about ideas.
The usual homemade pack method is to attach large 1 1/2 inch webbing from
the top of the shoulder straps to the backpack and to stitch it as much
as possible to distribute the stress. Distributing the stress to a big
area was my interest, but I wanted to do it a little better. After looking
at my Gregory Shasta pack and glancing at the Camp Trails shoulder straps,
I decide to use the triglides that came with the straps. Triglides are
often
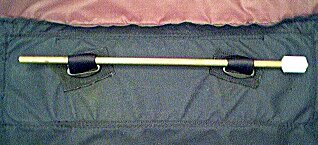
Frame System Redesign!: The usefulness of the plastic sheet and the copper tube as a frame design was running through my mind for some time. It seemed like the pack was still leaning away from my body more than I wanted. The frame sheet was pulling the fabric and the pack in towards me, but there was still considerable stretch of the fabric. Even with compression straps tugged tightly, it seemed like it could be better.
Let me try to explain the new design. With a small kitchen knife I cut two slots into my Z-Rest pad big enough to allow me to push the two triglides and webbing through it. I was worried about how the Z-Rest would hold up, but this is really tough material. Once the triglides are pushed through, the small copper tube is fed thru the webbing loops to secure them. Now when I put on the pack, the webbing pulls on the copper tube which pushes on the triglides and the Z-Rest pad. This pushes from inside the pack and secures the Z-Rest pad very firmly. Now the Z-Rest pad can sufficiently act as a frame sheet to distribute pack load to the other end of the pad, the lumbar region!
Together the concepts
of running the shoulder strap webbing and triglides through the Z-Rest
pad and the compression action of a webbing belt attached from the front
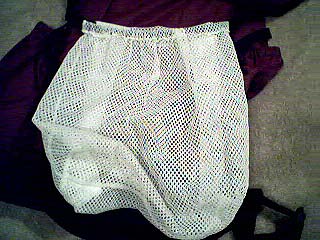
side are the main design factors that make this system work so well. Accessories: There hasn't been
much of a need for accessories, except for a small mesh bag for drying
wet items while I hike. The small mesh bag shown to the right was added
to the front of the pack, complete with elastic band for quick and easy
access. It can be rolled up and out of the way when not in use.
Last Revised: 02/06/2002
|
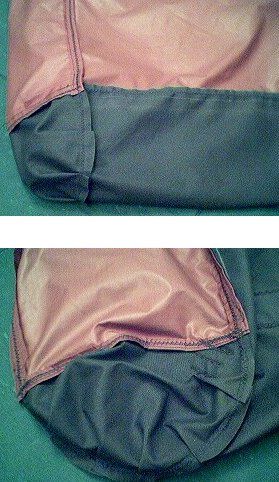
 The corner pieces were another difficult part of the pack design. They
had to be able to take a lot of stress. They also had to be able to transition
from the side pieces to the front and back pieces. The example piece shown
at the right was what I came up with. The design was for a radius of 3
1/2 inches. Don't forget to include an extra 1/2 inch for the stitch. The
extra sector (geometry term) of material is needed! When the folds are
made in the stitch the top section should straighten out so it will match
up with the side pocket. I would suggest making some folds and pinning
them up to take a good look at it. When you're convinced, stitch the corner
piece to the sides first (with pockets already completed). I used about
5 or 6 folds as shown in the photo detail below.
The corner pieces were another difficult part of the pack design. They
had to be able to take a lot of stress. They also had to be able to transition
from the side pieces to the front and back pieces. The example piece shown
at the right was what I came up with. The design was for a radius of 3
1/2 inches. Don't forget to include an extra 1/2 inch for the stitch. The
extra sector (geometry term) of material is needed! When the folds are
made in the stitch the top section should straighten out so it will match
up with the side pocket. I would suggest making some folds and pinning
them up to take a good look at it. When you're convinced, stitch the corner
piece to the sides first (with pockets already completed). I used about
5 or 6 folds as shown in the photo detail below.

 used on many of the commercially-made backpacks to attach the straps. One
of the advantages of using triglides is that you can remove the straps
from the backpack. I also reinforced the area that the triglides pulls
against with thick nylon webbing.
used on many of the commercially-made backpacks to attach the straps. One
of the advantages of using triglides is that you can remove the straps
from the backpack. I also reinforced the area that the triglides pulls
against with thick nylon webbing.
 This seemed to work well, but I soon realized when I loaded up the pack
that the stress was still focused around the triglides. I wanted to pull
the pack in close to my back, so I decided to try adding a small plastic
sheet to be used as a frame sheet. The plastic sheeting was placed on the
outside of the pack and sewn over with two layers of Cordura for added
strength. I originally use a plastic notebook divider, but it soon cracked
and split under the stress. You might consider using plastic from a small
office size garbage can or an old plastic laundry basket. Let your imagination
run wild and I'm sure you'll find something to use as a frame sheet. Also,
you might consider using some Velcro on one of the ends so you can remove
the plastic sheeting if necessary.
This seemed to work well, but I soon realized when I loaded up the pack
that the stress was still focused around the triglides. I wanted to pull
the pack in close to my back, so I decided to try adding a small plastic
sheet to be used as a frame sheet. The plastic sheeting was placed on the
outside of the pack and sewn over with two layers of Cordura for added
strength. I originally use a plastic notebook divider, but it soon cracked
and split under the stress. You might consider using plastic from a small
office size garbage can or an old plastic laundry basket. Let your imagination
run wild and I'm sure you'll find something to use as a frame sheet. Also,
you might consider using some Velcro on one of the ends so you can remove
the plastic sheeting if necessary.
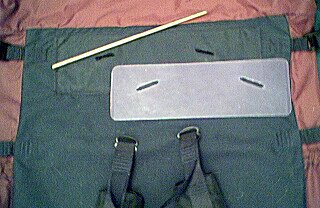 The frame sheet helped, but it was flimsy and I later added a thin copper
tube to run through the webbing to add rigidity to the whole system. Hobby
stores usually care thin lightweight copper tubing. It's important to make
sure that the plastic sheet and the copper tube do not overlap the Z-Rest
pad. If you use your pad like I do, folded in two sections, then you should
keep the length of the plastic and the copper tube down to about 10" or
less. Instead of copper tubing, you could use a wooden dowel or maybe even
a small stick. The plastic frame sheet adds 3/4 oz. and the copper tube
adds about 1/4 oz. With the added Cordura this small frame system adds
about 1 1/4 oz. to the weight of the pack. These pictures tend to show
it better than I can explain it.
The frame sheet helped, but it was flimsy and I later added a thin copper
tube to run through the webbing to add rigidity to the whole system. Hobby
stores usually care thin lightweight copper tubing. It's important to make
sure that the plastic sheet and the copper tube do not overlap the Z-Rest
pad. If you use your pad like I do, folded in two sections, then you should
keep the length of the plastic and the copper tube down to about 10" or
less. Instead of copper tubing, you could use a wooden dowel or maybe even
a small stick. The plastic frame sheet adds 3/4 oz. and the copper tube
adds about 1/4 oz. With the added Cordura this small frame system adds
about 1 1/4 oz. to the weight of the pack. These pictures tend to show
it better than I can explain it.
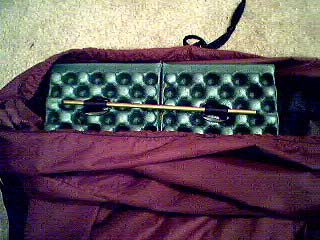
 The whole usefulness of this design becomes apparent when you use everything
together. When you place the Z-Rest pad inside the pack with the compression
straps everything must be snuggled up tightly. When it's tight you'll know
it and the pack will ride snug to your back.
The whole usefulness of this design becomes apparent when you use everything
together. When you place the Z-Rest pad inside the pack with the compression
straps everything must be snuggled up tightly. When it's tight you'll know
it and the pack will ride snug to your back.
 Then a new idea hit me! "Why not push the triglides and webbing all the
way through the Z-Rest pad?" It turned out to be the best frame system
for a frameless pack that I have ever designed! By frameless I mean that
every item used in the frame is a multipurpose item.
Then a new idea hit me! "Why not push the triglides and webbing all the
way through the Z-Rest pad?" It turned out to be the best frame system
for a frameless pack that I have ever designed! By frameless I mean that
every item used in the frame is a multipurpose item.
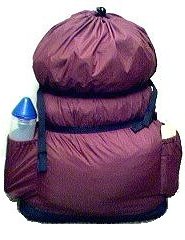
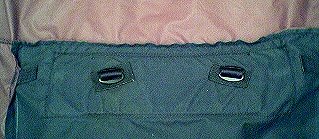
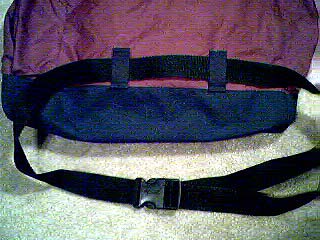 To compliment the new design and to make sure the load is lifted off the
shoulders and distributed to the lumbar region a one and half inch webbing
belt has been added. I don't consider this a hip belt, because there are
no hip pads. What's unusual about the webbing belt is that it attaches
to the "front" side of the pack rather than the "back" side of the pack.
The webbing belt runs through two webbing loops which keep the belt from
sliding down while your hiking. Also, since the belt runs around the "front"
of the pack there is no chance of it irritating your backside. The webbing
belt acts more like a couple of compression straps than a hip belt by pulling
in the bottom and sides of the pack. It helps if you have a good sized
bag, tent and/or cloths to stuff in the bottom of your pack. This combination
of compression from the webbing belt and the bottom of the Z-Rest pad acting
as a lumbar pad completes the lower half of this frame design.
To compliment the new design and to make sure the load is lifted off the
shoulders and distributed to the lumbar region a one and half inch webbing
belt has been added. I don't consider this a hip belt, because there are
no hip pads. What's unusual about the webbing belt is that it attaches
to the "front" side of the pack rather than the "back" side of the pack.
The webbing belt runs through two webbing loops which keep the belt from
sliding down while your hiking. Also, since the belt runs around the "front"
of the pack there is no chance of it irritating your backside. The webbing
belt acts more like a couple of compression straps than a hip belt by pulling
in the bottom and sides of the pack. It helps if you have a good sized
bag, tent and/or cloths to stuff in the bottom of your pack. This combination
of compression from the webbing belt and the bottom of the Z-Rest pad acting
as a lumbar pad completes the lower half of this frame design.