|
|
|
The instructions below can be downloaded as a zipped Microsoft Word file here. (1.34MB) A printable version is also available. Please give this page time to load. if you are on a 56.6 it should take about 2 min. These are a little messy right now, but I'll go through and clean them up later.
Ultralight
Pack
G4
by GVP Gear
IntroductionThis
pack began as an experiment to see how light I could make a pack.It
is highly specialized to the way my main hiking buddy Read Miller and I
hike and the gear we carry.It is
designed to carry loads of 20 - 30 lbs.It
is based on the first three packs I made, which have been used for 3 seasons
and hundreds of trail miles. Read
had a number of requests.One was
that the pack be light.He likes
to carry a Platypus with a drinking hose, so he wanted an outside side
pocket where the water can hang upside down for ease of drinking, but be
visible in case it leaks.Our sleeping
pads are Z-Rest pads that are cut down to 6 sections and trimmed to 15
wide.Read wanted to be able to
sit on his pad while he packed his pack, then put the pad onto the pack
for back padding.He likes to take
a slightly larger sleeping bag for some winter trips, so the bottom of
the pack is larger for that purpose.He
wanted a spot that he could shove something to dry out without worrying
that it would slip from under a strap and drop unnoticed to the trail.He
likes a waist belt to help secure the pack and distribute the weight.
Features·Weight:
12 oz. (depending on how short you trim straps, how big your waist is,
etc.)
·Capacity:4400+ cu. in. ·Deep mesh side pockets for water and quick-access items ·Mesh back pocket for drying items ·Waist belt included ·Material cost:approx. $30 Material List(first number is Quest Outfitters item no. 800/ 359-6931) 1013200 denier coated oxford1 yd. 10142.2 oz. coated ripstop nylon1 yd. 1209Lycra micro mesh 1/6 yd. 1201Poly mesh1/2 yd. 20301 nylon webbing (lt. wt.)2 2/3 yd. 2031¾ Grosgrain ribbon2 2/3 yd. 24023/32 shock cord4 yd. 30101 ladderlock buckles2 ea. 30671 Dual side release buckle1 ea. 2600thread (120 yd. spool)3 ea. 3059 elliptical toggle1 ea. 2100¾ Hook (like Velcro)1/3 yd. 2101¾ Loop (like Velcro)1/3 yd. For optional roll-top closure (a better system) instead of slide top closure, order 2100¾ Hook 1/3 yd. more 2101¾ Loop1/3 yd. more 2402Shock cord1 ½ yds. less 10142.2 oz. coated ripstop nylon1/3 yd. less 2031¾ Grosgrain ribbon1/3 yd. more Other substitutions you may want to consider Substitute 1044 330 Denier Codura for the oxford cloth the cordura is a little heavier, but has a higher thread count and is a little more durable. For solid side pockets if you travel through brush a lot, order an additional 1/3 yd. of ripstop. For lighter mesh, order the 1207 Mesh Lining for use in pockets.Some people have had troubles with brush ripping holes in the pockets, but others have used their packs for hundreds of miles with little or no damage.Put a small panel of ripstop in the bottom. For a lighter pack, you could use 1024 1.1 oz. silicon-coated nylon in place of the 2.2 oz. ripstop.The 1.1 oz. usually has more limited color availability, and is much more difficult to work with because it is do darned slippery.It is not recommended for your first attempt. Note:all seams ½ unless noted otherwise.Some basic sewing experience is assumed.Keep track of the coated (wrong or inside) and uncoated (right or outside) sides of the fabric.
Step
1: Cutting Materials
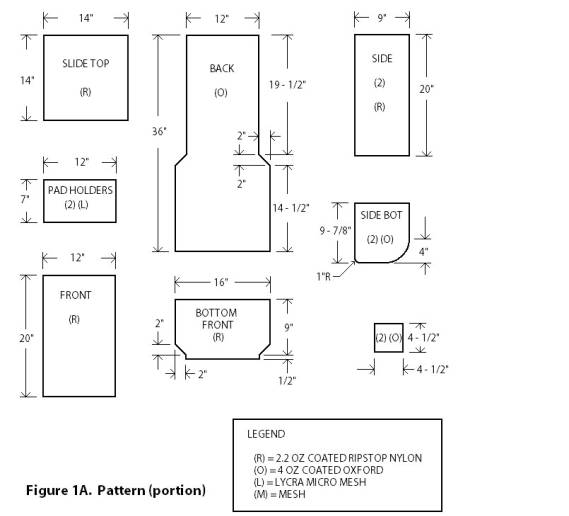
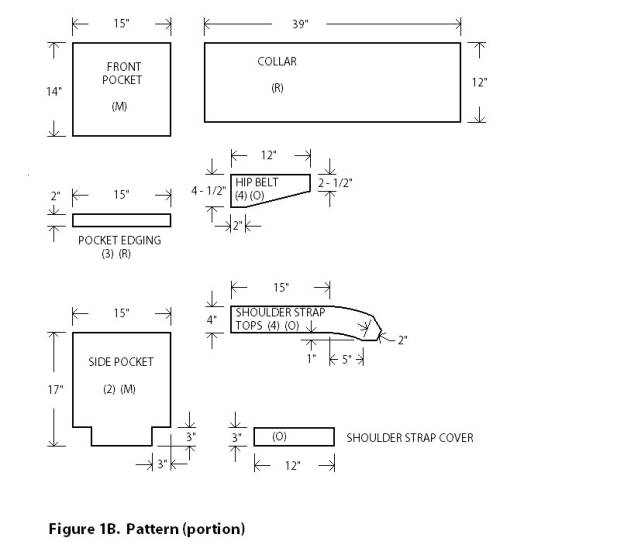
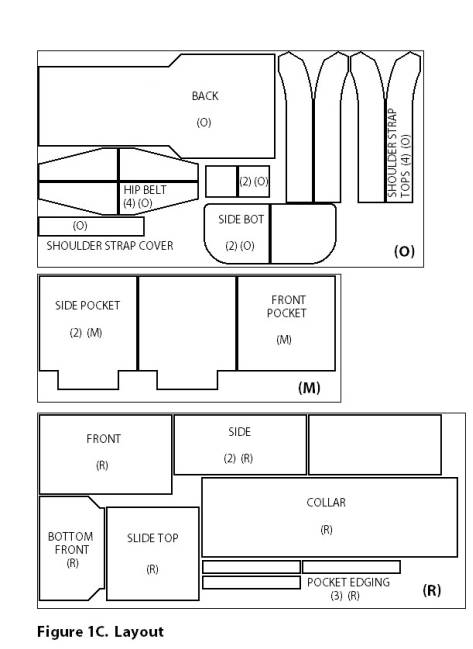
1.1Cut out all fabric pieces according to Figures 1A, 1B and 1C.Be careful on the side bottoms to cut one right and one left.A rotary cutter is very useful.Note that this pack is made for a medium-height to tall man.Some modifications of the dimensions may be indicated for people over 64 or shorter than 58.
1.2Cut out webbing pieces as follows and sear all ends with a flame: 1 10 piece of 1 webbing (haul loop) 2 5 pieces of 1 webbing(shoulder strap tops) 2 18 pieces 1 webbing(waist belt) 2 20 pieces 1webbing (shoulder strap bottoms) 8 3½ pieces ¾ Grosgrain (side lashing loops) 1 10 piece ¾ Grosgrain (bottom lashing/ice axe loop) 4 4 pieces ¾ Grosgrain (drinking tube holders, if desired) 2 5 pieces ¾ Grosgrain (optional roll-top closures) 2 6 pieces ¾ Grosgrain (thumb loops, if desired) 1 12 piece ¾ Grosgrain (top pad holder) 1 16 piece ¾ Grosgrain (bottom pad holder) 1.3Cut out shock cord pieces as follows: 3 18 pieces (top of pockets) 1 48 piece (drawcord for main compartment) 2 24 pieces (slide top) 1.4Cut hook and loop pieces as follows: 1 7 piece hook and loop (cut in half lengthwise to make 2 pieces 3/8 wide) 1 5 piece hook and loop (cut in half lengthwise to make 2 pieces 3/8 wide) for optional roll-top closure, cut: 2 2 pieces of loop 2 4 pieces of loop 1 5 piece of hook 2 2 pieces of hook Step
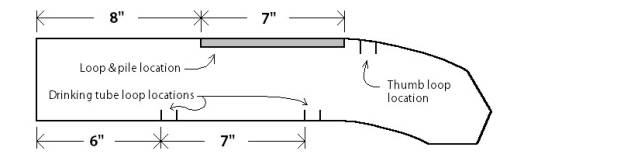
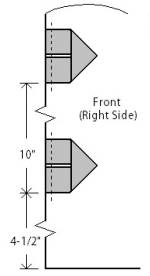
2:Shoulder Straps 2.1On right side of fabric, stitch thumb loops (6" grosgrain ribbon) and drinking tube loops (4" grosgrain ribbon) in lining of left and right straps where indicated on pattern and shown in Figure 2.
Figure
2.Attachment of loops to shoulder
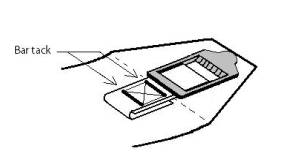
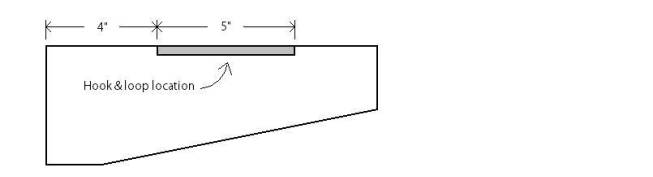
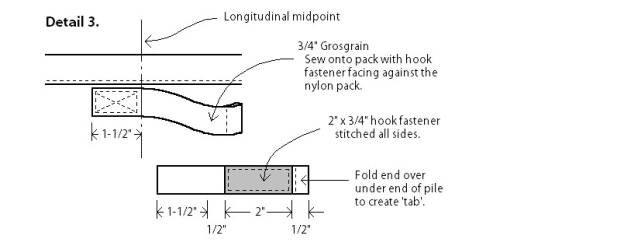
straps. 2.2Make a 1/2" slit in straps where indicated in Figure 2.Fold under (to the wrong side) between slits, making 7" tabs. 2.3Sew 1/2" hook and loop fasteners to wrong side of 7" tabs, hook on the lining and loop on the strap.See Figure 3. 2.4Sew linings to the straps, right sides together, leaving short, straight edge open.Trim corners. 2.5Turn shoulder strap right side out. 2.6Topstitch around edge of straps, except where hook and loop are attached. Reinforce the two ends of the hook and loop by bar tacking.See Figure 3.
Figure
3.Stitching on shoulder strap. 2.7Sew a straight line across end of strap, 1 1/2" in from end, per Figure 3. 2.8Sew ladderlock to shoulder straps with 5 piece of 1 webbing as shown in Figure 4.Bar tack webbing to straps where shown.Make sure you sew webbing on to end up with a right and a left strap.
Figure 4. Shoulder strap end assembly.2.9Set aside the tops of the shoulder straps, and sew the 4½ square shoulder strap braces (oxford cloth) onto the 20 long shoulder strap bottoms (1 webbing) as shown in Figure 5.
Figure
5.Shoulder strap braces. Step
3:Waist Belts 3.1Make 1/2" slits in waist belts and linings where indicated in Figure 6.
Figure
6.Layout of waist belt. 3.2Fold under (to the wrong side) between slits making a 5" tab. 3.3Sew 1/2" hook and loop fasteners to wrong side of tabs, hook on the lining and loop on the waist belt. 3.4Sew waist belts to lining, right sides together, leaving wide end (without hook and loop) open.Trim corners. 3.5Turn waist belt right side out. 3.6Topstitch around waist belts, except where hook and loop are attached. 3.7Sew 18 piece of 1 webbing onto the closed end (small end) of one of the waist belts.Fold end over and bartack as shown in Figure 7.Repeat for other waist belt, making sure you end up with a left and a right with the webbing sewn on the outside, so it wont rub against your waist.
Figure 7.Attaching webbing to waist belt.
Step
4: Back (Oxford Cloth)
4.1Haul
Loop 4.1.1Attach
10 piece of 1 webbing to the right side of the back, centered along the
top.Sew as shown in Figure 8.
Figure 8.Haul loop. 4.2Attaching
Shoulder Strap Tops 4.2.1Attach
the shoulder strap tops, open ends, onto the right side of the back panel,
as indicated on the pattern and Figure 9.On
the right side of the back, lay the straps down so the ladderlocks are
facing down, and the ends are curving away from the center.Edge
stitch and do two short bartacks per strap as shown in Figure 9.
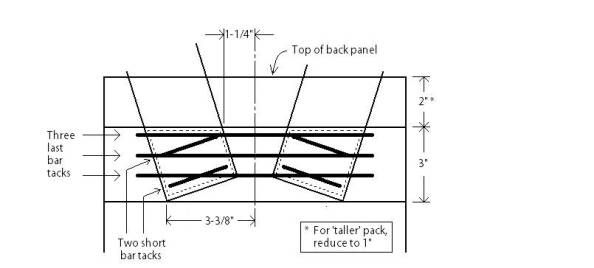
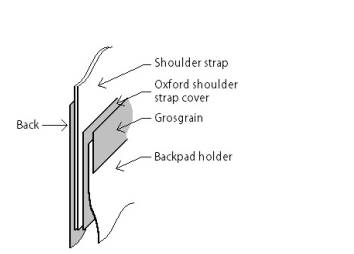
Figure 9. Shoulder pad connection to back.4.2.2Sew the shoulder strap cover onto the back panel, over the ends of the straps, positioned 2 from top as shown in Figure 9.Edge stitch and bar tack three times as shown in Figure 9. 4.3Pad Holders 4.3.1Sew the upper pad holder over the shoulder strap cover, positioning ¼ below the top edge of the shoulder strap cover.Pin to prevent from bunching up all at one end.
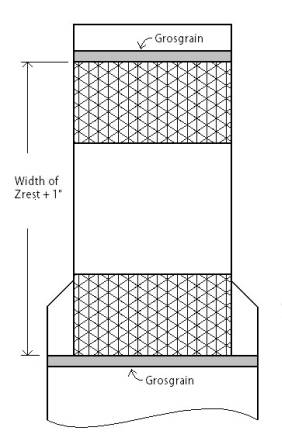
Figure 10.Section showing sequence of shoulder strap attachment. 4.3.2Add 12 piece of Grosgrain ribbon, covering top edges of the shoulder strap cover and the pad holder.Stitch around all four sides of the Grosgrain. 4.3.3Sew lower pad holder onto back panel in location shown on Figure 11.The spacing between pad holders will depend on the width of the Z-Rest pad.The pad is 20 wide when you buy it.I trim mine down to 15.If you are planning on carrying more than 8 sections, it will be thicker when folded up, and you may want to add an extra inch or two between the holders.Pin the mesh so it doesnt bunch up all at one end. 4.3.4Cover the bottom edge of the bottom pad holder with the 16 piece of Grosgrain ribbon and stitch around all four sides of the ribbon. 4.3.5Sew the edges of the pad holder onto the back panel with a 3/8 seam.Pin first so that the mesh doesnt stretch as you are sewing.
Figure
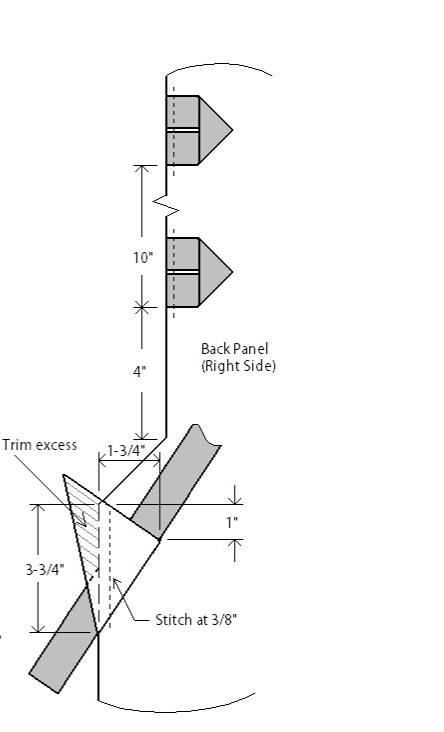
11.Placement of pad holders. 4.4Attaching Shoulder Strap Bottoms and Lashing Straps 4.4.1Sew
the shoulder strap bottoms onto the back panel per Figure 12. 4.4.2Sew the 4 3 ½ Grosgrain lashing straps onto the back panel as shown in Figure 12.
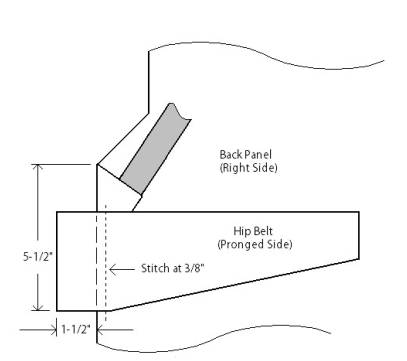
Figure 12.Placement of shoulder strap bottoms and lashing straps. 4.5Attaching Waist Belts to Back Panel 4.5.1Sew open ends of waist belts to back panel, using a 3/8 seam.Position as shown in Figure 13.
Figure
13.Attaching Waist Straps to Back
Panel
Step
5: Front (Ripstop)
5.1 Lashing Loops 5.1.1Sew 4 - 3½ Grosgrain lashing loops onto the front panel per Figure 14 with 3/8 seam.
Figure
14.Lashing loops on front panel. 5.2Front
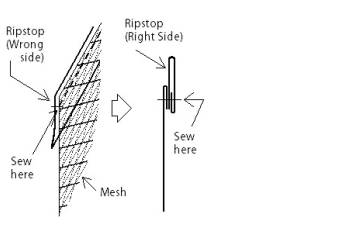
Pocket 5.2.1Sew one of the ripstop edge pieces onto the top edge of the mesh pocket, right sides together.See Figure 15. 5.2.2Fold to inside, line up ripstop edges, and stitch down, sewing over the seam you made in the last step.See Figure 15.
Figure
15.Top of pocket. 5.2.3Thread a 16 piece of shock cord into the channel.Sew across one end and a tie a knot in the end of the cord, close to where it is sewn across. 5.2.4Sew the pocket to the front panel.Line up so the bottom edges are even.Sew the sides first with 3/8 seam, being sure to catch the shock cord in the seam.You will need to tighten the cord to do this.After sewing over the cord, tie a knot in the end, close to the seam.When sewing the bottom of the pocket onto the bottom of the front panel, you will need to gather the pocket slightly, as it is wider than the front panel. 5.3Assembly of Front Panel 5.3.1Sew ripstop front bottom onto front panel, right sides together, as shown in Figure 16.The front pocket should be in between the two pieces.Double stitch.
Figure
16.Constructing the front panel.
Step
6: Side Pockets
6.1Sew
bottom corners of side pockets together to form a dart in the pocket shape.Leave
the last ½ open.Double stitch.See
Figure 17.
Figure 17.Side Pockets. 6.2Attach ripstop pocket edging to top of pocket in same manner as for front pocket, as shown in Figure 15.Thread the 16 pieces of shock cord, sew one end and knot.Trim any excess (not too close to knot) and sear with flame. 6.3Sew mesh pockets onto ripstop sides, bottom seam first.Be sure to tighten the cord to 9, sew it into the seam, then knot the cord, trim and sear. 6.4Sew the straight edge of the oxford bottom side piece onto the side, right sides together.Check to make sure you end up with a left and right side.Double stitch.
Step
7: Attaching the Sides, Front
and Back
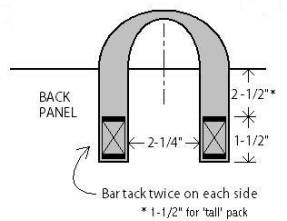
7.1Sew the front to the sides, right sides together, beginning at the angle point where the width of the pack changes. Make sure the left side is on the left and the right side is on the right.Sew up both sides, matching pocket edges.Double stitch.Bartack over lashing loops in seam allowance. 7.2Sew back panel to sides, right sides together.Double stitch.Bartack over lashing loops in seam allowance. 7.3Sew the front and the back panels together where they join, and trim off any excess ripstop. 7.4Reinforce
ends of shoulder strap bottoms and waist belts to inside of oxford side
bottoms.Flatten the back and the
strap and belt, pulling them tight to make sure its flat, and stitch around
edges of waist belt.Bartack twice
as shown on Figure 18.
Figure
18.Waist and shoulder strap reinforcement.
Step
8: Collar (Ripstop)
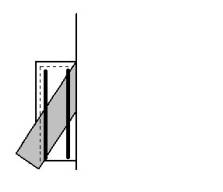
8.1Sew
the center seam of the collar, right sides together.On
the inside, stitch down the seam allowances on both sides of the seam.See
Figure 19.
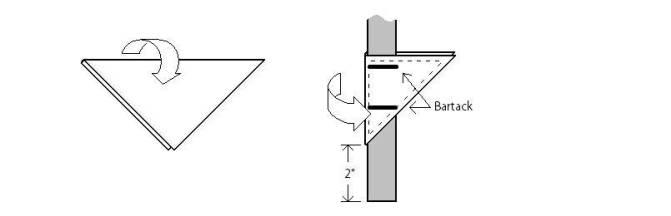
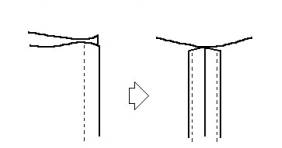
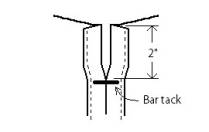
Figure 19.Collar. 8.2Open
the top 2 of the center seam.Bar
tack at new end of seam per Figure 20.
Figure
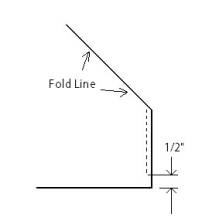
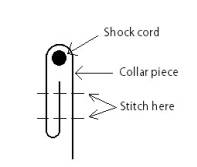
20.Collar center seam. 8.3Fold
the top edge to the wrong side, forming a sleeve for the shock cord.Fold
under ¼ and stitch down per Figure 21.
Figure 21.Collar sleeve for shock cord. 8.4Thread 48 shock cord into sleeve and attach toggle.Press down on toggle until it clicks to activate it.Sear ends of shock cord and tie together in knot that wont slip through the toggle.
Step
9: Finishing
9.1Slide
Closure The slide closure is in response to people hiking where it often rains that wanted a little additional protection.While we recommend you continue to pack your clothes and sleeping bag within a trash compactor bag or similar protection from water, you may want to construct either the slide top closure or the optional roll-top closure to provide an additional measure of security. 9.1.1Hem two opposite sides of the 14 square ripstop slide top. 9.1.2Fold over and sew the other two sides to create sleeves. 9.1.3Thread a 24 long piece of shock cord into each sleeve.Sew across the shock cord at one end of the sleeves so that 4 of shock cord is left out on that side.The shock cord protruding from the other end of the sleeve will be longer. 9.1.4Tie the short shock cords onto the upper lash loops on the back panel of the pack.Tie the longer shock cords onto the lower lash loops on the front panel of the pack.This configuration allows you to slide the top up and out of the way to access the inside of the pack.When closing the pack, first cinch up the drawcord, and pull it down through the bottom lashing loop.Use the toggle to catch against the loop and hold the top down with no need to tie a knot.Then slide the slide top down to cover the opening. 9.2Thread 1 webbing through ladderlocks on shoulder strap tops.Fold over the ends of the webbing about ¾, and sew near the folded edge.Fold so that the end is on the outside, which gives you something to grab when you tighten the straps. 9.3Trim the excess off the waist belt straps.Make sure to allow enough for when you are wearing additional jackets.You may want to wait until you have used the pack for awhile.Sear the cut ends with a flame and fold over and sew similar to the shoulder straps. 9.4Optional Roll-Top Closure See the illustrations below for making the roll-top closure.For instructions on use, see the sequence under the photos section of www.gvpgear.com .
|
Return to: [ Top of This Page ] [ Make Your Own Gear Page ]