The GOYA Stove
By: atraildreamer@yahoo.com
Note: I assume no
responsibility for anything you do with the following information on this page.
If you blow up your dinner or yourself or if you starve because the thing fails
you miserably -- too bad. Consider yourself warned and me indemnified
Intro:One of the neatest ideas I’ve seen for backpacking is the soda can stove, AKA: the Pepsi Can Stove. Literally made from discarded aluminum cans, and burning small amounts, (usually less than 1 Ounce/ 30 ml), of commonly available alcohol fuels, (methanol {dry gas}, denatured alcohol or rubbing alcohol), these lightweight homemade units can provide boiling water for a hot, trailside meal in a few minutes time.Problems:There are several drawbacks to these stoves.1. They are very small, approximately 2.5 in/ (64 mm) in diameter, and usually about 1in / (25mm high). This does not allow for much stability when balancing a large pot or frying pan on top, often leading to spills.
2. When the stability problem is addressed by making some type of cooking grate, usually out of coat hanger wire, etc., the weight and bulkiness of the ensemble increases significantly.
3. A windscreen is usually needed, (even on seemingly calm days), to keep the heat generated by the stove concentrated on the pot/ frying pan, also causing an increase in weight and bulkiness.
A Solution!
It occurred to me that there was a
method to overcome the above-mentioned problems very easily, inexpensively, and
tastily, thanks to the Goya Food Company!

The following
picture shows the evolution of what I call the GOYA STOVE:
Anyone who has camped out will be
familiar with the can on the left---Goya Brand Vienna Sausages! Readily eaten
cold right out of the can, toasted hot dog style over a campfire, mixed with
beans, etc., but have you considered the can in which they are packaged? The
large size can is made of rugged, lightweight aluminum with a white enamel
anti-corrosion inner coating.
Construction:
1. Open the can, eat the contents, clean out the
can and strip off the paper label.
- Starting from the bottom of the can, at the first
indentation that rings the can, drill or punch holes spaced about every ½ inch/(13mm)
around the perimeter of the can. I used a pin vise drill to start the
holes and widened each hole to approximately 3/16 in/(5 mm) diameter using
a small round file. I used eyeball measurements, the critical points being
making enough holes that are numerous enough, and large enough to admit
enough air to the soda can stove that will be mounted inside the Goya can.
Too few holes, or holes that are too small, will starve the soda can stove
of oxygen, causing it will go out.
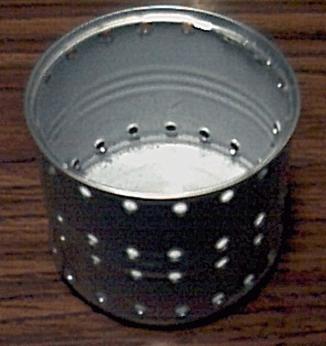
- At the top perimeter of the can, about 0.25in/ (6 mm)
from the open top rim, make a series of holes identical in size and
spacing to the holes along the bottom perimeter.
Can with top
and bottom perimeter holes drilled out.
THIS IS IMPORTANT!

These
top holes will prevent excessive heat buildup in the stove. Remember that you are dealing with a
flammable, potentially explosive liquid-- alcohol. Do you really want to have
your meal launched into the treetops, scaring the squirrels, while having
burning alcohol spraying everything and everyone nearby? This could ruin your
whole day, not to mention causing serious, life-threatening burn injuries.
- 1 inch/ (25 mm) from the bottom of the can, and 1 inch/
(25 mm) from the top of the can, in the indentations of the can, make2
rows of holes, spaced bout every 1/2in/ 13mm, that extend ONLY HALF WAY around the
can. This will allow more oxygen into the can, and also help to prevent
those previously mentioned nasty explosive situations to develop. Leave the back half of the can
undrilled. This will allow the back half of the can to act as a windscreen.
Top and bottom
holes go COMPLETELY around the can,
Holes in
middle of can ONLY GO HALFWAY around
the can:
- Cut the bottom off of a soda can about 3/8in/(10 mm)
high. Make 8 cuts in the metal, about 0.25 inch/ 6-mm deep, down the side,
so that the metal can be bent outward slightly. Trim the sharp corners off
of the cuts. This will be used as a “socket” piece.
If you prefer,
you can skip the socket and just glue in the soda can stove. But be warned once
the glue sets, the soda can stove is there forever!
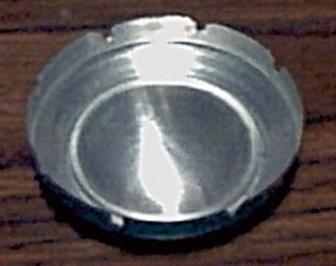
Socket
piece with cuts visible.
Center and glue this “socket” piece on
the inside bottom of the Goya can. I used silicone adhesive, but anything that
will take the heat can be used. This
“socket” will allow you to snap a soda can stove into the base of the Goya can,
and allow you to remove it later if you wish to experiment with various
versions of the soda can stoves that are to be found on the internet websites.
The soda can stove can be placed into
the socket upside down and used as a base to burn an Esbit tablet.
You can also used the bottom of the
upside down soda can stove to hold about 1 tablespoon of gelled methanol that
can be scooped out of a can of Sterno, or similar canned fuel, although this is
not as effective as using the liquid methanol (dry gas) fuel.
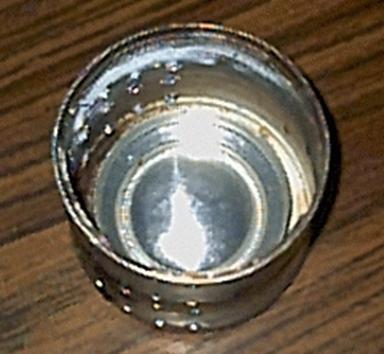
Socket glued
in bottom of Goya can
- Take a nylon-scouring pad, like the type used to clean
non-stick cooking surfaces, (They are sometimes sold under the “Scrunge”
brand name.), which measures at least 3.25 inches/ (83 mm) square, and
glue it to the outside bottom of the Goya can. Trim off the excess pad
overhanging the bottom of the can.
This provides
an anti-slip surface when you set up the Goya stove on a rock, etc., and
insulates the bottom of the stove from cold surfaces, which can dramatically
reduce the efficiency of the can stove.
Glue the
Scrunge pad to the bottom of the Goya can and trim.

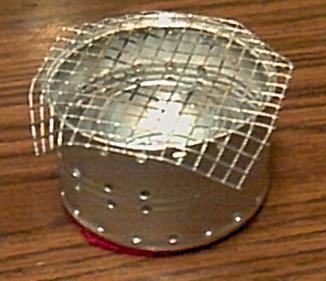
- Cut a square piece of wire mesh, sometimes called
“hardware cloth” or “chicken wire,” 3.75 in/ 95 mm by 3.75 in/(95
mm). Center it on top of the Goya
can and bend the corners of the wire mesh down at a 45-degree angle. These bends will keep the mesh from
sliding off the top of the can. I
used mesh with 0.25 in/(6 mm) openings, but use what you have available.
The wire mesh serves two purposes:
- It acts as a spark arrestor,
- It provides a rugged, anti-slip surface for various
size pots and pans.

Wire
mesh with corners bent.
The completed
Goya Stove is extremely compact, (3.3 in/(84 mm) in diameter and 2.7 in/(65 mm)
high.) It weighs in at 1 ounce/(28 grams.
Insert a soda
can stove into the socket inside the finished Goya stove can, put in some
methanol (dry gas) fuel. (DO NOT USE GASOLINE!!!), and
fire it up, drop the wire mesh over the top of the Goya stove enclosure and
start cooking!
Note: I am not going to give instructions on how to
build a soda can stove here. There are
many websites, including this one, which have the basic instructions. Just Google: “Pepsi can stove,” or, “soda can
stove.” In my experience, I found that the best soda can stove to use with the
Goya can is about 1 inch/ 25mm high. This allows about 1 in/ (25 mm) of clear
space between the top of the soda can stove to the bottom of the pot/pan that
you are heating.
I also found that the double wall type of soda can stove construction, with 12 equally-spaced burner holes that are about 1/8in/ (3 mm) in diameter, seems to work the best.
DON”T OVEFILL THE STOVE!
Try not to blow the stove, or yourself up!

Here is a picture of a typical soda-can stove burning in the Goya can stove:
As you can
see, once it warms up, the Goya stove can generate a SERIOUS AMOUNT OF HEAT! Experiment with various types of soda-can
stoves, starting with small amounts (1/4 to ½ ounces/(8 to 15 ml.)) of
fuel. Have your pot, etc., ready to go
and place it on top of the Goya stove. This will slow down the burn rate to a
reasonable level.
If you have to extinguish the stove, keep some water handy to put it out. Pour the water in slow-w-w-ly, without splashing. This will quickly extinguish the stove.
TRY NOT TO SPLASH THE BURNING ALCOHOL ONTO YOU!
MAKE SURE TO KEEP THE HOLES IN THE GOYA STOVE UNBLOCKED!
YOU DO NOT WANT TO CAUSE A DANGEROUS HEAT BUILD-UP, OR EXPLOSIVE SITUATION UP BY USING A SODA CAN STOVE THAT IS TOO LARGE FOR THE GOYA CAN ENCLOSURE!!!
Additional
minutiae:
These stoves
work best with methanol. The best source
of methanol is plain, old automotive dry gas, (check the label, some dry gas is
made with ethanol, which does not burn clean as does the methanol-based
products). Since it is basically all the same product, I usually buy the
cheapest. The Family Dollar chain stocks
it at 2 bottles for $1, but it usually only available in the winter months.
I don’t worry
about whether the cap on the dry gas container is replaceable; I usually pour
the contents into a graduated bottle that I bought at the local pharmacy. They
come in various sizes.
I tried to
find the much–mentioned Wal-Mart Grease Pot.
The only one I could find at Wal-Mart held about 1-½ quarts/(1.4 liters)
of liquid and was too large for use with the Goya stove. The salesclerk didn’t
think that they made the smaller ones anymore.
I did find an
unusual source of lightweight, INEXPENSIVE, cookware that is ideal for
backpacking. A local Spanish grocery store stocked an aluminum 2-cup
(16oz/(0.48 liter) grease pot made by the Cosmos Company of Columbia, South
America. It cost about $2. It is a perfect match for the Goya stove being 3.5
inches/ (88 mm) wide, ~ 5 inches/(127 mm) tall, and weighing in at 3.5 ounces/
113 grams. You can leave the strainer
top at home to reduce weight by ½ ounce/(14 grams).
They also sold
a small non-stick aluminum saucepot made by the Imusa Corporation (www.imusa.com.co) which had a
2-cup (16oz/(0.48 liter) capacity, it weighs 3.75 ounces/(106 grams). It cost
about $4. It does not come with a cover, but one can be made out of an aluminum
pie pan, or just use a piece of aluminum foil.
This is somewhat easier to use for cooking than the Cosmos grease pot. As a bonus, the entire Goya stove, including
the wire mesh top, fits inside the Imusa pot for compact storage.
Imusa also
makes a non-stick aluminum pan, with cover, which is variously described as a
paella pan, egg pan or mini-Dutch oven, weight is 3 ounces/(85 grams). It cost about $5. It is good for trail bread, pancakes, or
whatever you can concoct on the trail.
They also make a non-stick aluminum frying pan, with cover, that weighs
7 ounces/(198 grams). Cost is $5.

Imusa
sauce pan, Cosmos Grease Pot, and Imusa paella pan:
Total cost to
build the Goya Stove:
$0.99 One can of Goya Vienna Sausages.
$0.10 Nylon scouring pad (10 for $1 at the local
dollar store.)
$0.07 Wire mesh (cut from a larger piece @
$1.59/foot.)
$0.00 Socket piece, soda can stove- made from free
recycled materials.
$1.16 Total cost of Goya can stove.
Total
construction time- about 1 hour.
Weight of Goya
stove, with wire mesh top, is 1 ounce/(28 grams).
Weight with a
typical soda-can stove is 1 ½ ounces/(43 grams).
Test with Imusa pot
2 cups (16oz/(0.48 liter) of water at 34° F/(1° C)
brought to full boil at 212 ° F/(100 ° C) in 8 ¼ minutes
using 1 oz./(30 ml.) of methanol fuel. Fuel burned out in 10 minutes.
Any comments or suggestions on how to improve the Goya Stove?
Please contact me at:
The GOYA Stove in MS Word format: GOYA Stove (MS Word)