|
www.TrailGear.org |
The last
alcohol stove you'll ever need! Backpackers, Hikers, Campers and Survivalists
are discovering this versatile backpacking stove.
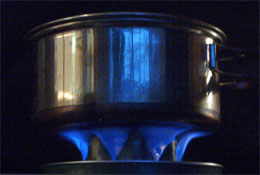
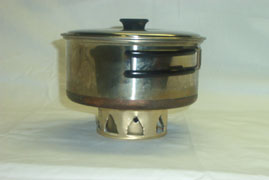
This powerful little stove can boil 2 cups of water within 4 minutes and runs on denatured or 70% rubbing alcohol. This is a variation of the traditional Cat and Super Cat Stoves. This version adds safety to the Super Cat Stove by incorporating a simple and stable pot stand.
Just a note on pressurized stoves and how they work. These simple stoves create pressure when the cooking pot is placed on top of the stove, sealing the top opening. This creates the simplest version of a pressurized stove I've found. As the stove heats up it vaporizes the alcohol which is ignited and continues to burn until exhausted.
I'll also show you how to build two non-pressurized stoves, possibly the best all weather alcohol stoves around. One of which is a Simmer Stove that can burn for close to an hour.
Let's get started building this simple alcohol stove ...
TOOLS &
MATERIALS:
Safety glasses One 3 ounce can of cat food. Cost - Less than $1.50. IMPORTANT: You need to
purchase two 5.5 ounce cat food cans from the same supplier.
The diameter of the can is important to the design of this stove.
Not all brands are the same size, so it's important to buy cans from
the same manufacturer. Note: I prefer name bands over generics
because the quality of aluminum is better.
Picture (1) Cut a narrow strip of aluminum foil (1" wide x 12"
long, doubled over) to wrap around the Simmer base. Also, cut a half moon
simmer plate out of one of the discarded lids or any scrap aluminum, bend
up a corner so it's easy to grab. You'll also need a paper clip or
small metal clip to secure the aluminum foil strip (to cover the 4 intake
holes) around the Simmer Base. Picture (2) Drill 4 - 1/4" air intake holes from 1/8" to 1/4"
down from the top lip around the can. For best performance - do not
alter the hole size or their placement around the can.
The following stoves are shown without windscreens. I'm assuming
you're familiar with building and using a windscreen. If not,
windscreens can be easily made out of aluminum foil or disposable aluminum
pans used to cook large meats like turkey.
To build a simple windscreen use a piece of tin foil wrapped around the
stove and cooking pot. The tin foil should extend from the ground to
about 1" to 2" up the side of the cooking pot, with a 1/4" to 1/2" gap
around the cooking pot. Puncture a few small holes around the bottom
of the windscreen to let air into the stove. Take a look at some
windscreen examples in the stove section at www.HomeMadeGear.com or
www.ZenStoves.net
The cooking times listed below are based on using denatured alcohol
with perfect weather conditions at 78 degrees, no wind and limited
humidity. These times may fluctuate based on your environmental
conditions. Note: pressurized alcohol stoves have problems
vaporizing the fuel in cold weather. For cold conditions I recommend
using my Wood Burning Trail Stove or my non-pressurized
Stove #3 below.
To start this stove ... Place the stove on a safe, flat
noncombustible surface. Pour denatured alcohol (4 tea spoons max)
into the 3 ounce burner. Carefully ignite with a lighter or match.
Wait about 30 seconds for the stove to heat then carefully place the
cooking pot on the stove.
Problems: The small 3 ounce can lacks stability, unstable
platform for cooking pots. Can not simmer. Does not work well in cold
temperatures. To start this stove ... Place the stove on a safe, flat
noncombustible surface. Place the 3 ounce burner inside the 5.5
ounce vented pot stand. Pour denatured alcohol (4 tea spoons max)
into the 3 ounce burner. Carefully ignite with a lighter or match.
Wait about 30 seconds for the stove to heat then carefully place the
cooking pot on the stove.
Drill
with 1/4" drill bit or Uni-bit.
Bottle opener (church key).
Tin
snips or Dremel tool with cutting wheel
1" wide x 12" long strip of
aluminum foil
Paper clip or small metal clamp
Two 5.5 ounce cans of cat food.
Build time - 20 minutes.
STEP 1. PUT ON YOUR SAFETY GLASSES!!!. Always
use eye protection when working with metal. Make the burner.
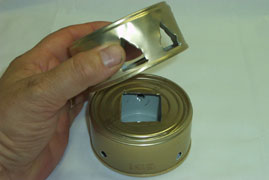
Take the 3 ounce can of cat food, remove the lid and drill 8 - 1/4"
holes around the center of the can. Use your dremel tool to grind
down the jagged edges on the inside of the drilled holes. IMPORTANT:
For best performance - do not alter the hole size or their placement
around the can. 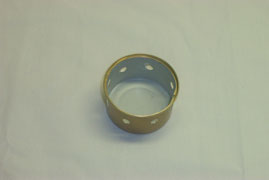
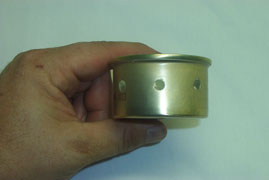
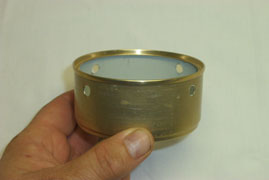
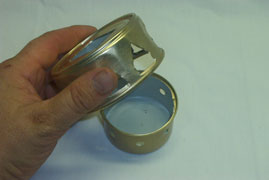
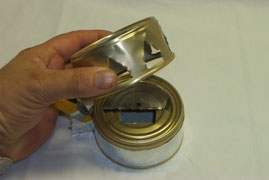
STEP 2. Make the pot stand. Take one 5.5 ounce
cat food can, remove the lid, make 8 vent holes around the can using your
bottle opener or church key (puncture outside in from the top opening),
trim off the punched tabs with your dremel tool. Also, cut an
exhaust hole (using tin snips or dremel tool) in the bottom center of the
can. In this example I made a square, but you can make a circle if
you desire. 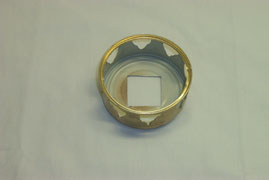
STEP 3. Make the base for the Simmer Stove. Take
the second 5.5 ounce cat food can, remove the lid, cut an exhaust hole in
the bottom center of the can. In this example I made a square, but
you can make a circle if desired. Note - both exhaust holes (step 2
& 3) must not exceed the inner diameter of the smallest circle
in the bottom of the can (note the black outline in picture 1 below).

FINISHED STOVES:
STOVE #1. This is the Super Cat Stove configuration
(by Jim
Woods) which consists of only the 3 ounce burner with the
cooking pot. With this setup you'll boil water in 3 to 4 minutes
using 3 tea spoons of denatured alcohol. Total burn time 4 to 5 minutes.
Benefits: Very simple, very efficient. One piece
pressurized stove. Rapid boil times.
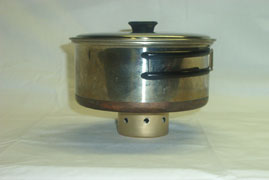
STOVE #2. Here I show you my favorite setup using the
3 ounce can as a burner and the larger 5.5 ounce can as the pot stand.
With this setup you'll boil water in 4 to 5 minutes using 3 tea
spoons of denatured alcohol. Total burn time 5 to 7 minutes. 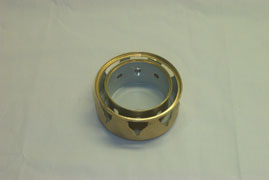
VERSION 1: Burner inside the pot stand.
VERSION 2: Pot stand over the burner. Note - this version works best if you want to quickly switch to the Simmer Stove after the boil.
To start this stove ... Place the stove on a safe, flat noncombustible surface. Pour denatured alcohol (4 tea spoons max) into the 3 ounce burner. Place the 5.5 ounce vented pot stand over the 3 ounce burner. Carefully ignite with a lighter or match. Wait about 30 seconds for the stove to heat then carefully place the cooking pot on the stove.
Problems: Slightly longer boil times than stove #1 (Super Cat
Stove) above. Two piece stove as opposed to one piece. Can not simmer.
Does not work well in cold temperatures.
Benefits: Simple to
use. Larger diameter pot stand creates a more stable platform for cooking
pots. Acceptable boil times. Longer burn times. Pressurized stove.
STOVE #3. Here's an excellent all weather
non-pressurized stove. With this setup you'll boil water in 4 to 5
minutes using 3 tea spoons of denatured alcohol. Total burn time
about 6 to 7 minutes. This setup works best when it's too cold for
your pressurized stove. This is my version of the original Cat Stove
(by Roy "TrailDad" Robinson).
Here's a tip about the four air intake holes in the Simmer Base.
If you notice the boil times are too long, try increasing the air
flow into the stove by placing the Simmer base on the ground, using a
branch or twig, dig little trenches that extend under the stove base.
This will allow extra air into the stove (under the bottom lip)
which will shorten the boil times. Your other option is to make
additional intake holes. However, be careful if you add holes (once
you make them you're stuck), too much air flow will cause the stove to
burn out too fast. 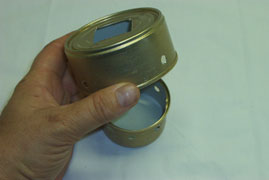
Place
the 5.5 ounce Simmer Base over the 3 ounce burner. 

Place
the vented pot stand on the Simmer Base then place the cooking pot on the
stove. Note: To avoid spilling make sure the top vented pot stand is
securely placed on the bottom simmer base. This is why you need cans
from the same supplier. Mismatched name bands may not stack
correctly.
To start this stove ... Place the stove on a safe, flat noncombustible surface. Pour denatured alcohol (4 tea spoons max) into the 3 ounce burner. Place the 5.5 ounce simmer base over the 3 ounce burner. Now place the 5.5 ounce vented pot stand on the simmer base.
Carefully ignite through the top vent holes with a lighter or match. Wait about 30 seconds for the stove to heat. Carefully place the cooking pot on the stove.
Problems: Three piece stove as opposed to one or two pieces.
To avoid spilling make sure the top vented pot stand is securely
placed on the bottom simmer base.
Benefits: Simple to use. Quick
boil times. The best all weather stove.
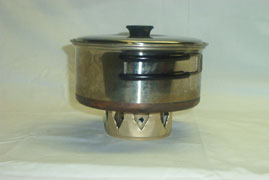
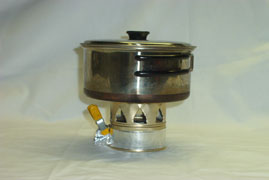
STOVE #4. Here's an excellent non-pressurized Simmer
Stove. Total burn time about 35 to 45 minutes using 3 tea spoons of
denatured alcohol. 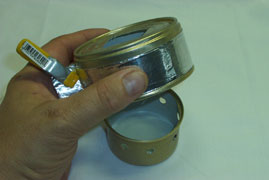
1)
Wrap the strip of aluminum foil around the bottom of the Simmer base
(secured with a clip) covering the four air intake holes. Lost your
foil strip? If you drilled the four intake holes as directed in step 3
above (close to the lip) you can cover the intake holes with dirt.
By choking the air flow into the stove you can produce a low
temperature slow burning flame.
2) Place the 5.5 ounce Simmer Base over the 3 ounce burner, followed by
the half moon simmer plate for adjusting the flame. 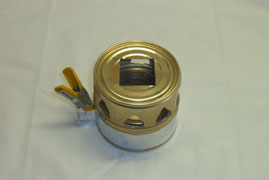
3
& 4) Place the vented pot stand on the simmer base then place the
cooking pot on the stove. Note: To avoid spilling make sure the top
vented pot stand is securely placed on the bottom simmer base.
To start this stove ... Place the stove on a safe, flat noncombustible surface. Pour denatured alcohol (4 tea spoons max) into the 3 ounce burner. Place the 5.5 ounce simmer base over the 3 ounce burner followed by the half moon simmer plate (exposing the exhaust hole to its maximum size). Now place the 5.5 ounce vented pot stand on the simmer base.
Carefully ignite through the top vent holes with a lighter or match. Wait about 30 seconds for the stove to heat. Carefully place the cooking pot on the stove. Control the flame by adjusting the half moon simmer plate as desired using a piece if wire, twig or needle nose pliers through the holes in the vented pot stand.
Problems: Three piece stove as opposed to one or two pieces.
To avoid spilling make sure the top vented pot stand is securely
placed on the bottom simmer base. Long time to boil water.
Benefits: Simple to use. Adjustable flame control. Extremely
long cooking times. All weather stove. Perfect simmer stove.
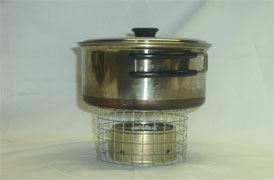
BETTER POT STAND: For those of you who would like a
better pot stand (for stoves 3 & 4 above), here's a variation using
the 5.5 ounce Simmer base over the 3 ounce burner. 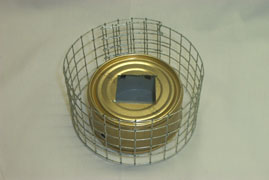
Using heavy wire mesh screening, cut a strip 2.5 inches wide x 15
inches long. Wrap the wire mesh around the Simmer base, overlapping
the ends just a little. Secure by hooking the tips of the outside
wire into the inside overlapping mesh. Now place the cooking pot on
the pot stand. This is the safest pot stand for stoves 3 & 4
above. If you build this pot stand correctly it will fit inside the
cooking pot for storage.
EXTINGUISH THE FIRE:
Since this is an alcohol fueled
stove the only safe way to extinguish a burning fire is to place an opened
ended can (larger in diameter than the 5.5 ounce can) over the top of the
stove. This will cut off the air supply and extinguish the fire.
DO NOT attempt to blow the fire out and DO NOT throw water on the
stove, this will only spread the fire.
TIPS:
1) This stove is designed for use "only"
with small backpacking cooking pots!!!
2) This stove uses
alcohol based fuels like denatured or 70% rubbing alcohol. Be
careful with alcohol stoves because the flame may not be visible in the
light. WARNING: Never use gas or
petroleum based fuels in the stove.
3) Always wipe you hands of
any spilled alcohol before lighting the stove. Failure to do so
could cause injury when you ignite the stove.
4) Always place
the cooking pot on the center of the stove.
5) Keep all body
parts and clothes away from the stove at all times.
6) To avoid
flare ups, always remove the cooking pot slowly from the stove.
7)
Always remove the cooking pot from the stove before stirring its
contents.
PROBLEMS AND SOLUTIONS:
Problem: Fire goes out
after the cooking pot is placed on the stove.
Solution: The
stove is not hot enough to sustain the flame. You need to pre-heat
the stove. Place a piece of tin foil under the stove. Bend up
the edges of the foil to make a bath tub around the stove. Pour a
little denatured alcohol in the tub. Carefully light the tub and
wait about 30 seconds. This will pre-heat the burner, allowing the
flame to continue when you place the cooking pot on the stove.
DISCLAIMER:
Use common sense and safety at all times
when using any stove. The author of this web page will not be
responsible for any injury or damage resulting from constructing or use of
this stove design. If you choose to build, use or experiment with
this design, do so at your own risk.
I also have an excellent wood stove, check out my ... Wood Burning Trail Stove
Send the author an e-mail jfalk555@yahoo.com
Copyright © - All rights
reserved.