Backpack Design Questions
Posted by: 4evrplan
Backpack Design Questions - 01/22/16 07:54 AM
I'm thinking about building a prototype backpack that's custom fit to me and will test out an idea or two, but I have a few questions about proper design that I hoped someone could answer.
1) How far below the waist should the pack hang?
2) Is my torso measurement (from waist to the prominent neck bone) the ideal exact distance between the top and bottom strap attachment points, or is there an allowance here or there for something I'm not thinking of?
3) Any tips for deriving a shoulder strap shape that fits my body best? My idea is to draw on myself with chalk and transfer that to fabric, but I'm not sure exactly where it should lie against me.
Thanks.
Posted by: Pika
Re: Backpack Design Questions - 01/22/16 09:21 AM
I've made several packs with varying degrees of success. Perhaps my experience will be helpful. The packs I have made have been in the 2600 to 3400 cubic inch volume range. My weight goals have been 10 - 16 ounces. I have included an aluminum "hoop" stay as part of several packs. This adds both weight and comfort.
1). I generally have about 3-5 inches of pack below the bottom of the hip belt attachment. Much more than this and the pack can ride annoyingly on your upper butt. I also design this part of the pack to curve away from the hip belt.
2). My measured torso length is greater than the distance between the shoulder strap attachment point and the top of the hip belt. For me, the difference is 2-3 inches. The shoulder strap attachment needs to be low enough that the straps can curve up over your shoulder before dropping down your chest to the lower attachment. The exact placement of hip and shoulder strap attachments is best determined experimentally
3). I use a simple "J" shape shoulder strap similar to those used on the G4 pack. I think you can get the shape of the G4 straps online. Several things are important with the shoulder straps. First, the space between the straps where they attach to the pack at the top. If you are thick necked you need more distance. Second, the angle of the straps with the mid line of the pack is important. On my most recent pack the departure from vertical is about 3.5" in 12". The length of padding is important too. If the strap padding gets between your torso and your arm it can be irritating as you swing your arms. And, the width of the padding is a consideration. I prefer a narrower strap over some of the wider versions I have made. A wider strap can chafe against your neck and can rub against your arms when walking.
There are several pack patterns available with the designers ideas built in. I have made each of them and have not found any to my complete liking. You might, though, want to take a look at one or another to get some basic ideas. You can get the G4 pattern from Quest Outfitters, an alpine pack design from Rainshed in Corvallis, Oregon, or a RayWay pack kit from Ray Jardine. All have websites.
The pack I just finished is a 3000 cubic inch, 14 oz. version combining what I liked about each of these packs. I also incorporated an aluminum stay similar to that used in the Six Moons Design Starlite pack. Good luck with your planning.
Posted by: 4evrplan
Re: Backpack Design Questions - 01/22/16 10:23 AM
I know craft foam is sometimes used for the strap padding. Is that what you use, and if so, what thickness?
Posted by: Pika
Re: Backpack Design Questions - 01/22/16 10:40 AM
I use 3/8" thick closed cell poly foam. This is the same stuff that the blue Walmart sleeping pads are made of but 1/8" thinner and black. I get it from Quest Outfitters but I suspect that if I were to look around I could get it locally and cheaper.
Posted by: 4evrplan
Re: Backpack Design Questions - 01/22/16 11:05 AM
That's good; I've got some scraps of WM pad foam I can use. I might sand it down to the preferred thickness (with a mask and goggles of course).
Also, where do you source the metal for your hoops? I'm going to try without one first, but I may need to add one afterwards if it's not enough support.
My idea for getting enough support without a stay is to roll an inflatable pad around the inside of the pack, load all the other stuff into the middle, and then partially inflate the pad until everything's nice and rigid.
Posted by: Pika
Re: Backpack Design Questions - 01/22/16 11:39 AM
I use a pad pocket made of 1.8 oz rip stop in preference to the rolled pad. In my experience the rolled pad makes the pack ride somewhat like a beer keg with shoulder straps; not particularly comfortable IMO. My folded Thermarest Prolite 3, short, makes a good stiff "frame" if I go with the stay removed
It is better to plan for the stay while making the pack rather than trying to retrofit. I sew in sleeves for the stay and have a webbing pocket in which to seat the bottom ends. The pocket is sewn on to the hip belt reinforcement piece near where the hip belt attaches. All this is hard to do once the pack is assembled.
I got the aluminum from a metals supplier in Tucson. I don't recall the alloy number but it is used in aircraft. It needs to be bendable but still stiff. I used 1/4" diameter rod. The piece I use for the stay weighs a bit under 4 oz. If I can remember, I'll look up the alloy number but if someone else reading this has the info, don't be shy about posting it.
Posted by: bluefish
Re: Backpack Design Questions - 01/22/16 11:52 AM
2024-t4 aluminum rod. You can buy it online.
Posted by: 4evrplan
Re: Backpack Design Questions - 01/22/16 12:08 PM
I sew in sleeves for the stay and have a webbing pocket in which to seat the bottom ends. The pocket is sewn on to the hip belt reinforcement piece near where the hip belt attaches.
So, the horizontal part of the stay is at the top, right, like an upside-down U? And this sleeve is on the inside or the outside of the pad pocket (closer to your back or farther)? Any chance you could share pictures?
Thank you for all the help, BTW.
Posted by: Pika
Re: Backpack Design Questions - 01/22/16 12:51 PM
Yes, the stay fits in as an upside-down U. I use Velcro tabs on a lightweight flap to cover the upper, cross-bar, end and to hold it in place. The sleeves are 2" wide by about 20" long strips of coated rip stop that are folded into a tube and sewn into the seam that joins the side panel to the back panel (closest to your back). The stay is placed on the piece nearest your back and the pad sort of fits between the side rails.
Pictures of the stay installation would be tough since it is almost all inside the pad pocket. I'd be happy to share photos of what I can photograph including the upper part of the stay assembly. PM me your email address and I'll dig out my camera.
Posted by: 4evrplan
Re: Backpack Design Questions - 01/22/16 12:59 PM
It says you're over your message limit. That's okay, though; I think I've got it.

Posted by: 4evrplan
Are Load Lifters Necessary? - 02/04/16 12:43 PM
New question: I'm having trouble wrapping my mind around just what exactly load-lifters even do. Are they even necessary with a properly fitting pack?
Posted by: aimless
Re: Are Load Lifters Necessary? - 02/04/16 01:37 PM
Hint: they won't lift your load off your legs, but they ought to lift the load off (the top of) your shoulders.
They are an adjunct to your hip belt, which ought to be transferring all your pack weight to your hips. Ideally, your shoulder straps are only stabilizing your pack from falling backwards, and they will only press against the front of your torso and shoulders, not heavily down on your shoulders.
Necessary? It all depends!

Posted by: OregonMouse
Re: Are Load Lifters Necessary? - 02/04/16 01:54 PM
If, like me, you have pressure-sensitive shoulders, load lifters are absolutely essential to take the weight off the tops of your shoulders. Properly posititioned, they do transfer additional weight to the hip belt. Whether this is necessary for you depends on your personal body configuration.
Go try on a bunch of different packs--with weight--to find out what load lifters do, if anything, for you.
Posted by: 4evrplan
Re: Are Load Lifters Necessary? - 02/04/16 02:18 PM
After reading up on it some more, I think I've got it. If anything, perhaps with properly fitted load-lifters, the part of the shoulder strap that goes over the top would be unnecessary. It seems like, in an ideally fitted pack at least, the shoulder straps only real utility is holding the pack up long enough to get the waist buckle clipped and the load lifters adjusted.
Posted by: 4evrplan
Re: Backpack Design Questions - 02/05/16 11:23 AM
I've more or less cemented all the major design features in my mind, and I've ordered all the hardware, webbing, and shock cord. I was really pleased with how inexpensive it all was. I'll be using free 'fabric' (feed bags - it is a prototype after all). The foam I'm using for padding was left over from another project, so it's essentially free. I'll also be using a nice piece of birch plywood that a friend is going to give me for $3 as a frame sheet. With all that and the thread it'll take, I estimate this project will cost about $13 and some time.
Here's a few details about the design, though it's still somewhat fluid.
* I'll be using a full wrap-around style hip belt with generous foam and 1 1/2" webbing. It'll slide into a sleeve on the main body of the pack, so it'll be removable. If everything works out, I'll strongly consider adding pockets to the hip-belt.
* The shoulder straps (SS) and load-lifters (LL) will be the McHale style where the LL and SS adjustments are independent.
* I'm considering steaming and shaping the plywood frame sheet into a more natural curve, but I'm not sure. I've never tried to re-shape plywood, and even if it worked, it might not be worth it, especially with a wrap-around hip belt holding it off of my back anyway. I will probably also drill holes in it to lighten it up.
* The main body of the pack will essentially just be a minimally modified feed bag, but I will rip the bottom seam and add a better shaped bottom so it's not flattened out like an envelope.
* The top closure will be the dry-bag style where it just folds down a few time or more and then the two side clips buckle to each other. Or, would that be, "the two side buckles clip to each other"?
* Even though It'll have a frame sheet, I'll still put my pad in it to take up extra volume and stiffen it up. Hopefully, this way, I won't need compression straps. If this doesn't work, I'll add compression straps by hand down the road, or I'll just know I need them on my 'forever-pack'.
* The feed bag material is very water-resistant, if not water-proof. I might seal the seams.
* I'll also do the more or less now-standard large exterior pocket to hold wet or quickly-needed items and two side pockets for beverages, all with shock cord at the top. I'll also punch drain holes in the bottoms of the pockets.
Can you tell I'm getting excited?
Posted by: 4evrplan
I've Got Should Straps! - 02/06/16 01:08 PM
Thanks to Rodney Liwanag for making his LAB pack plans available online. These straps are heavily based on his.
Posted by: OregonMouse
Re: I've Got Should Straps! - 02/06/16 02:07 PM
It will be interesting to see how your final pack works out and how well it works! With photos, hopefully?
Posted by: finallyME
Re: Backpack Design Questions - 02/08/16 10:16 AM
I was going to tell you to go read McHale's site about load lifters.....Looks like you already did that. Looking forward to your final product.
One thing that McHale talks about and that I have found out, is that the more the load is transferred to the middle of the hip belt (think just below both arm pits) instead of riding on your but, the better it rides and the less tight the belt needs to be.
Also, for sealing the feed bags, look at the tape used to seal tyvek at home depot. It will probably stick better than a lot of other options.
Posted by: 4evrplan
Re: Backpack Design Questions - 02/08/16 11:47 AM
Thanks for the tips, FME. I was thinking about using
this stuff to seal the seams, but tyvek tape would be a lot easier and look better.
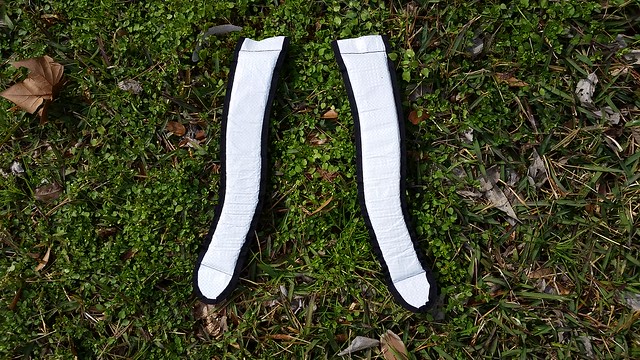
And speaking of hip belts. I've pretty much finished the base part of the hip belt, meaning I made the padded part, but I haven't attached the webbing or buckle. I hope to post a picture before too long. But, I'm not really happy with it. I think it's too short. It would probably work for me, but I'm really thin. If anyone ever wants to borrow it, it probably wouldn't be long enough to cushion their hips. I also don't think I made it wide enough, especially since it doubles as a lumbar pad. I'm going to re-do it.
I also had to re-make the shoulder straps. The ones in the picture are the second and, hopefully, final version. The first version was based on the G4 "J" straps, but I made they WAY too big. Here's hoping making everything twice won't be a continuing pattern.
Posted by: finallyME
Re: Backpack Design Questions - 02/08/16 05:28 PM
If you are using a feed bag for the pack, they are made from polyethylene. Silicon won't stick that great to it. Tyvek is a polyethylene, so the tyvek tape will stick better since it is made for that purpose.
Posted by: 4evrplan
First Version of the Hip Belt (Failed). - 02/10/16 10:13 AM
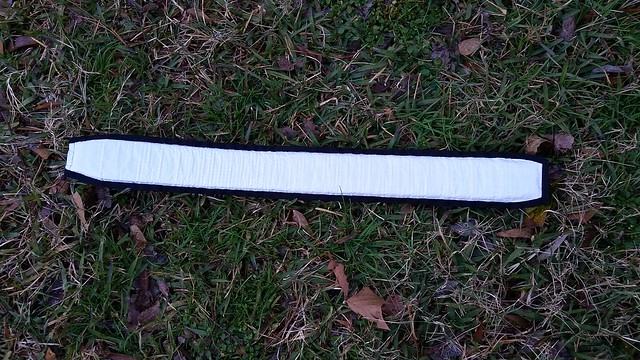
Here's the first hip belt I made, which I don't like. The foam in it is only 26" long (the hem makes it slightly longer), which would probably work for me, but not many other people. More importantly, it's shy of 3" wide, which I don't think will be supportive enough, especially in the lumbar region. I'm still working on it, but the next version will taper from 2.25" at the ends all the way up to 4" in the lumbar region (plus hems). This widest part will be 8" long before it starts to taper.
I've got another quick question for people who have made a pack before. Do you prefer to sew the webbing directly to the padded part of your hip belt or to have it run through loops (like the belt loops on a pair of pants)?
Posted by: 4evrplan
Re: Backpack Design Questions - 02/10/16 10:21 AM
One thing that McHale talks about and that I have found out, is that the more the load is transferred to the middle of the hip belt (think just below both arm pits) instead of riding on your but, the better it rides and the less tight the belt needs to be.
Interesting. That got me brainstorming ways to transfer the load better to the sides, including some that resemble the "wing thing" idea. One idea that I think might work is to back the hip belt with something rigid in the vertical direction and flexible in the horizontal. Corrugated plastic (from political campaign signs) would fit the bill. I'd simply orient it with the channels running vertically and pre-crease every one so it'd be nice and flexible around my hips. Do you think it would be worth the weight?
Posted by: Pika
Re: First Version of the Hip Belt (Failed). - 02/10/16 10:50 AM
I sew the webbing directly to the fabric of the hip belt (or shoulder straps). I sew the webbing to one of the fabric pieces with bar tacks and a perimeter stitching. I then sew the two fabric pieces together with the right sides in and then roll the fabric over the foam bringing the right sides to the outside. Then, I will stitch through the fabric and foam in several places to bind the assembly into a unit. This last step is important, I think, because otherwise the fabric will shift on the foam and the webbing can wind up riding you where you least want it. BTW, I'm making all of this sound easier than it is.
Posted by: finallyME
Re: Backpack Design Questions - 02/10/16 10:54 AM
One thing that McHale talks about and that I have found out, is that the more the load is transferred to the middle of the hip belt (think just below both arm pits) instead of riding on your but, the better it rides and the less tight the belt needs to be.
Interesting. That got me brainstorming ways to transfer the load better to the sides, including some that resemble the "wing thing" idea. One idea that I think might work is to back the hip belt with something rigid in the vertical direction and flexible in the horizontal. Corrugated plastic (from political campaign signs) would fit the bill. I'd simply orient it with the channels running vertically and pre-crease every one so it'd be nice and flexible around my hips. Do you think it would be worth the weight?
I don't think that would be as comfortable as you think. You want your belt to contour on your hips. I have been kicking around different wing ideas. I think the weight is worth it, while at the same time trying to minimize the weight increase as much as possible.
As far as sewing on the straping, my first one, I sewed through the padding. I had to do this by hand and used really heavy thread. It worked just fine. My second attempt, I used a heavier fabric and sewed directly to the outer fabric and then used spray adhesive to attach it to the foam, and then sewed a border and an inner fabric to the whole thing. I think it just matters what you are attaching the pack to. If the pack is attached to the webbing, then the padding itself isn't holding the weight, it is just padding the webbing.
Posted by: 4evrplan
Re: Backpack Design Questions - 02/10/16 11:06 AM
I don't think that would be as comfortable as you think.
Even with 3/8" of foam between me and the plastic?
Posted by: 4evrplan
Re: First Version of the Hip Belt (Failed). - 02/10/16 11:25 AM
I then... roll the fabric over the foam... I'm making all of this sound easier than it is.
The difficulty I had turning the first version of the shoulder straps right side out after sewing and then stuffing the foam is the reason I decided to sew with the right side out and then hide the seams with grosgrain. Even with this method, it still took me over two hours just to stuff in the foam for the hip belt. I wish I'd thought of rolling the fabric onto the foam. I think I'll stick with sewing right side out, though, for two reasons. 1) I really like the look of the grosgrain edging, and 2) I think the taper of the hip belt will make the next one a lot easier to stuff.
I'm going to take your advice about sewing the webbing on and sewing through to lock it all together. I think my machine should be able to do it with the foot raised if I turn it by hand.
Posted by: finallyME
Re: First Version of the Hip Belt (Failed). - 02/12/16 09:52 AM
I'm going to take your advice about sewing the webbing on and sewing through to lock it all together. I think my machine should be able to do it with the foot raised if I turn it by hand.
If that doesn't pan out.... hand stitching isn't too hard, or take too long. Just use thicker thread, to compensate for fewer stitches.
Posted by: 4evrplan
Re: First Version of the Hip Belt (Failed). - 02/12/16 10:33 AM
I've done lots of hand stitching, but I've never been happy with the look of it. I might try a stitching wheel to keep the spacing consistent, but here's hoping I don't have to.
Posted by: OregonMouse
Re: First Version of the Hip Belt (Failed). - 02/12/16 02:04 PM
General advice from one who's been doing a lot of sewing the past few years, which I in turn got from workshops given by women with a lot more experience than I have:
After every 10 hours of sewing, change the needle, clean and oil your machine. If you're sewing silk or similar synthetics (like nylon), change the needle more often.
For hand sewing, there is a quilting accessory called Tiger Tape which will help you keep your stitches even.
Posted by: 4evrplan
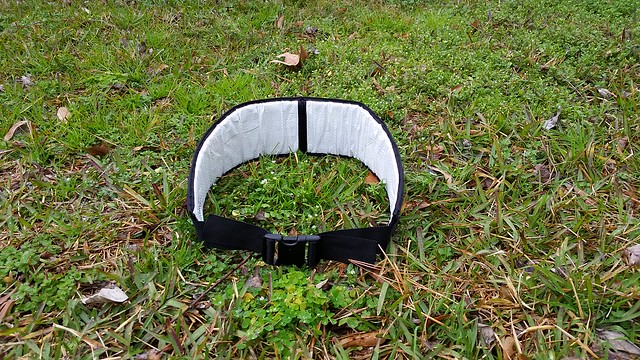
Hipbelt Done! - 02/15/16 11:45 AM
More or less.
Posted by: bluefish
Re: Hipbelt Done! - 02/15/16 05:45 PM
Looks good!
Posted by: 4evrplan
Good start on the main compartment. - 02/16/16 12:29 PM
I sewed a bottom onto the bag.
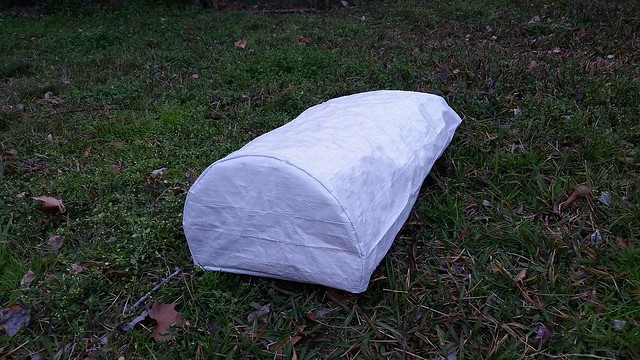
The flat side is the part that goes against my back. I was worried it wouldn't have enough volume for my gear, so I figured I'd make it as close to a cylinder as possible, given the flat side, because a cylinder has a large volume compared to it's surface area (the amount of fabric). I actually used 3d modeling software to estimate the volume, and if I leave the top open, it's right at 50L. Of course, it'll be a bit less with the top rolled closed, but I'll add an extension collar. I actually wrote a tiny little program to crunch the numbers and come up with the correct radius for the partial circle, given the dimensions of the bag and the width of the frame sheet. I think it worked out really well.
With the new bottom in, it stands upright on it's own.
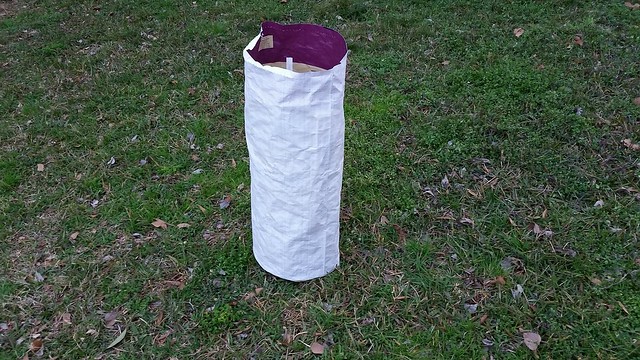
ETA: In order to sew everything on/in (straps, belt, pockets, and frame) I'll have to cut down the side of the bag vertically and sew it back together when everything else is done. But, I don't think the bottom will be in the way.
Posted by: 4evrplan
Frame Sheet Progress - 03/01/16 10:16 AM
It's been a long time since I posted on this project, because you know, life happens. I'm using plywood as a frame. I'd tried to add lightening holes manually with a spade bit, but it tore up the wood pretty badly, and I decided to start over with another piece. Well it just so happens I have a friend with access to a laser cutter, and he let me use it. Without further ado...
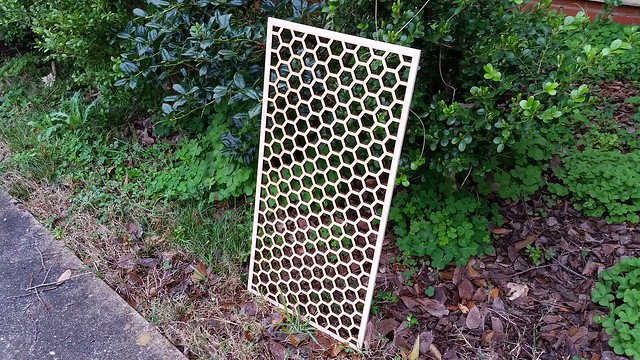
Even with so much material removed, it's still nice and stiff. I can bend it a bit by hand, but I think it will work nicely in the backpack. It's still surprisingly heavy though! I don't have a very precise scale, but I would hazard a guess at around 8oz. It'll just have to work though. The next step is to make it reasonably water resistant somehow. I'm thinking polyurethane. I think I've still got an old can in storage somewhere, but who knows if it's still any good?
Posted by: OregonMouse
Re: Frame Sheet Progress - 03/01/16 05:49 PM
Looks quite decorative!
Posted by: bluefish
Re: Frame Sheet Progress - 03/02/16 08:25 AM
My first internal frame was bought from a small manufacturer in Chico, Ca called Caribou Mountaineering. It had a huge single bag and a web system to lash on tools on the outside. The supports were 2 strips of African Basswood, roughly 1 1/2"x 1/4" which would bend but not break. I think it's the only pack I've seen which used wood supports. The strips were fitted into 2 4" sleeves top and bottom and you could remove the strips if you needed to. I gave it to a friend and it still sees a trip a year or so, after nearly 40 years. Is your plywood going on the inside of your bag? Most grades of plywood over time, with stress and drying, will de-laminate unless its marine grade. Don't mind me, I'm just a regular old carpenter. That laser cutting is impressive.
Posted by: 4evrplan
Re: Frame Sheet Progress - 03/02/16 10:00 AM
Bluefish, yes it will go on the inside. That's too bad about the delaminating. Unfortunately it's not marine grade (that stuff is expensive!). I'm starting to think I should have gone with a metal or composite frame, but I don't want to spend any more money at this point. If it's just going to break down anyway, I might as well just throw it in there untreated. It should be fairly protected in the bag anyway and hopefully last long enough to evaluate the design. Thanks for the professional input.
Oh, and regarding the laser cutting, I was rather pleased with it myself. It's too bad it'll be hidden away. I think if I were to do it again, I'd make the walls between the hexagonal cells thinner and maybe the strips at the top and bottom less wide as well. It could stand to go on a diet. If that made it too flexible, I'd put a couple of reinforcing strips on it like an I-beam. This took about 1.5 - 2 hours to cut though, so I'm not going to bother my friend with it. I'll just deal with the extra few ounces.
Posted by: 4evrplan
Re: Frame Sheet Progress - 04/22/16 09:47 AM
I know I said I was going to leave the frame as-is, but the more I thought about how heavy it is, the more it bothered me. I finally took it to the post office and got it weighed. 11.8oz! I'm definitely going to shave this thing down some more.
Posted by: BZH
Re: Frame Sheet Progress - 04/22/16 05:34 PM
have you thought about bamboo poles?
Posted by: 4evrplan
Re: Frame Sheet Progress - 04/22/16 05:42 PM
Good idea! I can get a pack of 3ft (ish) bamboo "roasting sticks" for 88 cents. Should also make great kite sticks.
Posted by: 4evrplan
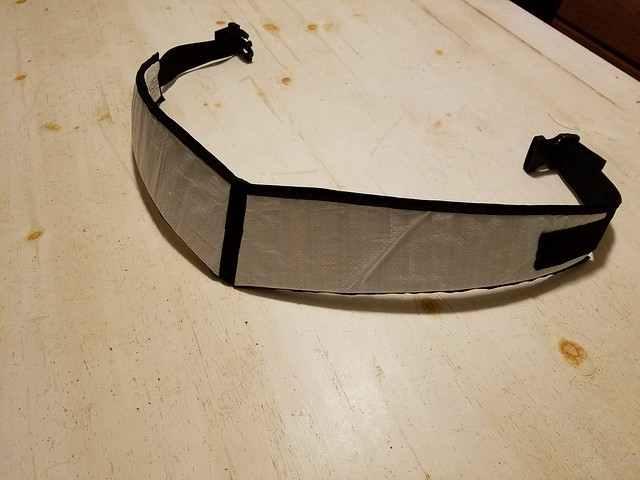
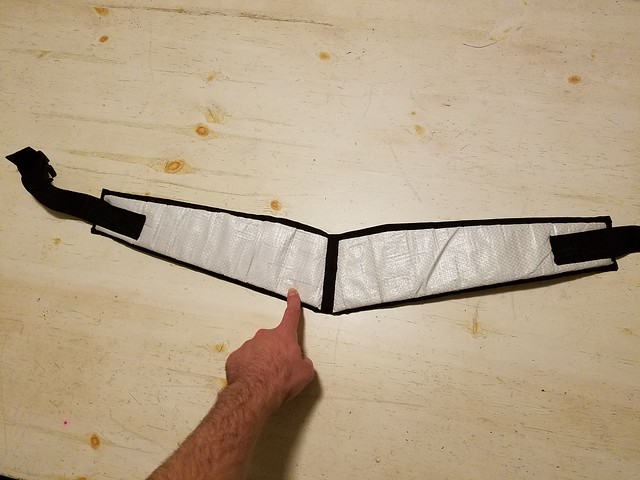
Re: Hipbelt Done! - 01/15/17 12:26 AM
It's been almost 9 months since I worked on this project, but I'm back to it now. I've revamped the hip belt. Before, there was a big gap between my back and the top of the belt, rather than hugging my lumbar. I brainstormed different ways to fix this, but in the end, it was very simple. I just cut the belt in half, angled the edges where the two pieces would form a V, and sewed them back together. This effectively removes the extra material that was causing it to gap in the back. It feels
much more snug and secure now.
Posted by: Petro1234
Re: Hipbelt Done! - 01/16/17 05:25 PM
I hate to do this too you but are you putting a back pad at the illac crest of your back ( the bit that curves towards your ass) ? That may interfere with the hipbelt snug fit ? If you think about it when you walk the rucksack is going forward and thrusting down your lead leg by driving into your back. If you get good contact you get good load transfer. Alot of the best light bags ( exped lightening ) do not skimp on the padding only on the rest of the bag.
I like the plywood frame shame its so heavy, a couple of aluminium stakes only weigh 4 oz. What alot of companies do is have a stiff foam back, sometimes reinforced with thin steel rods.
What weight are you looking to carry ?
Posted by: 4evrplan
Re: Hipbelt Done! - 01/16/17 05:43 PM
Petro, I'm not really sure I understand the question, but the only padding is in the hipbelt itself, none on the pack. The belt will be sewn directly to the pack.
For the frame, I've switched to bamboo skewers. It was $0.88 for a whole package, so I couldn't resist trying it out. I'm gluing together three for each vertical support (cut to two feet) and three for the top horizontal piece (cut to a foot). I'll report how it works after it's all put together.
For weight, I'd carry an absolute max of 40lbs. I've carried low to mid 30s in the past, but I'm looking to reduce this. I'm switching from an oversized tent to a "polycryo" tarp when it's not too buggy, and of course, the pack itself will be much lighter.
Posted by: Petro1234
Re: Hipbelt Done! - 01/16/17 07:25 PM
They usually do a lumbar pad which is a wedge of foam in the middle of the hipbelt as you probably know, the wedge is usually thicker at the bottom than at the top to transfer the weight into the back.
Such as

If that doesnt work try this link you will see what i mean,
http://www.aventurenordique.com/exped-lightning-60.htmlLooking good though, where did you get the info about the shape of the hipbelt please?
Posted by: 4evrplan
Re: Hipbelt Done! - 01/16/17 09:26 PM
I think I see what you mean. With the way the belt fits snuggly against my lumbar region after the last modification, I'm hoping that won't be necessary. However, if it is, I should be able to add a lumbar pad after the fact. The shape of the hip belt is an amalgam. I started with the G5 belt. The V came about initially from thinking about adding two separate darts to take in the slack, and then from reading about how the McHale hip belts form a V in both the front and the back. That's when I realized that adding a single dart in the back, or cutting off the extra altogether and reattaching it into the V shape is essentially the same thing.