My Newbie Gear Log

Posted by: 4evrplan

My Newbie Gear Log - 01/21/13 08:38 AM

This is meant to be a record of the gear I'll build up in preparation of my first backpacking trip this spring. It may not all be strictly homemade, but I suspect it mostly will, so I'm posting it here. All costs are given in US dollars.

First piece of gear: cat can camping stove. I'll refrain from posting a picture as I'm sure you've all seen these. I haven't had the chance to test it yet, as I just finished making it and have to be at work in about 25 minutes, but I'll report later. Cost: $0.44.

Update 01/21/13 02:27 PM - Stove and Headlamp
I tested the stove over my lunch break by trying to boil about 3/4 cup of water in a stainless measuring cup. It worked great. I don't think it ever quite boiled, but with a lid, a black pot, and a bit more fuel, I think it would work great.

Also, I got this headlamp, the cheapest one I could find at a local Sports and Outdoor chain, which was also the smallest and lightest they had that would work without having to clip onto a hat. I cut off the excess strap along with the little spring loaded plastic adjustment thingy and sewed it together at the right length for my head. I also wrapped orange cord around the strap so it would be easy to see.

Cost: $8.99

Update 01/22/13 08:43 AM - Spoons
I got these disposable plastic spoons from a frozen yogurt place. They're surprisingly good quality, and I'm pretty sure they're polypropylene, which takes a fair amount of heat. I tested it out by stirring boiling water with one of them, and it didn't melt or deform at all, even when pushing it against the bottom of the pot. I got it to melt by holding directly over a flame, but I won't be doing that while I'm camping.
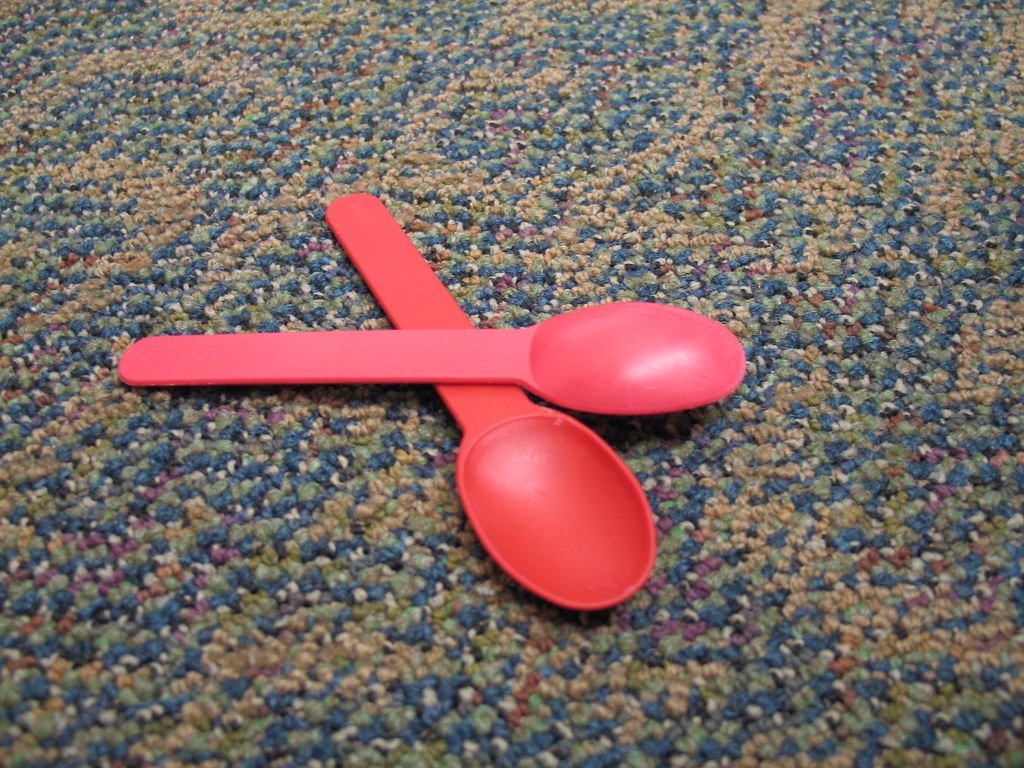
Cost: Free!

Running Total: $9.43
Posted by: 4evrplan

Walking Sticks - 01/28/13 09:50 AM

Some neighbors down the street have a patch of cane growing at the back of the property. I walked over and asked if I could cut down a couple, and now I've got these walking sticks.

The tape on each end will hopefully prevent the cane from cracking and splitting and acts as a handle. The cost was just pennies worth of tape, but we'll call it an even dollar to keep things simple.

Running Total: $10.43
Posted by: rockchucker22

Re: Walking Sticks - 01/28/13 10:12 AM

Great job! I have some bamboo I cut 10 years ago and it is so tough, should make great hiking poles.
Posted by: OregonMouse

Re: Walking Sticks - 01/28/13 01:13 PM

Using these will let you know if you like trekking poles enough to invest in adjustable ones with comfortable hand grips. I have to use adjustable poles because the pole length I need for hiking is shorter than the length needed to hold up my shelter! If you're less "vertically challenged" than I am, this won't be a problem.

How much do these poles weigh?
Posted by: 4evrplan

Re: Walking Sticks - 01/28/13 03:43 PM

Well, I haven't weighed them yet. I don't have an accurate scale at home, and I'm hesitant to bring them to my friend at the local post office, because they look like hobo gear, and people who didn't do crazy things in the pursuit of the outdoors (like hanging out on this forum) might not understand.

As far as height, they're exactly 49 3/4 inches tall. To figure out how long to cut them, I pinched a pencil under my arm pit with the lead facing backward, stood up as straight as I could against the wall and made a mark, measured how high that mark was, and subtracted three inches. I probably wouldn't use poles at all, except that making cane walking sticks is far cheaper than buying tent poles for the tarp shelter I plan to make. Here's hoping they're tall enough for that.
Posted by: CamperMom

Re: Walking Sticks - 01/30/13 10:45 AM

One of my friends used bamboo to make a pack frame and walking sticks. (Sorry, I don;t have any pictures.) He has used these for years.

To reinforce his bamboo hiking sticks, I think he wrapped some sort of twine around the ends and applied epoxy. Some people "invest" a couple of bucks in rubber cane tips from a medical supply of some sort.

CM
Posted by: skcreidc

Re: Walking Sticks - 01/30/13 12:04 PM

Something that has not been listed is the rattan fighting staff. Durable, flexible, and can really wallop something if need be. One downside is that they weight about a pound plus. The bamboo walking sticks iare a sweet home made alternative.
Posted by: 4evrplan

Shoes and Rain Gear - 01/30/13 05:17 PM

It didn't occur to me for a while that my everyday shoes were hiking "gear", but they're very comfortable, light, breathable and in spite of what they look like seem to be holding up. Plus they're trail runners, not fancy top of the line, but completely sufficient, so why not post them up. Well, here's my humble shoes:

I've had them for a while, but I think I got them on sale for about $50. Thing is, because they're my everyday shoes, I would have bought them even if I never touched another trail again, so for the purposes of this log, I'm calling them free.

Next up, is what may likely be the single nicest piece (well set) of gear I've got, my rain suit. Anyone who's looked over my posts probably figured out that my number one priority in choosing or building gear is cost. That's because I've set some very tight budgetary restrictions for myself, and I've actually been enjoying the challenge of coming up with as many free and dirt cheap solutions as possible. Having said that, it's nice to have something quality sometimes, but even so, I was just planning on using 88 cent emergency ponchos, which can be repacked and reused if you baby them. Even if I shred a few of them per trip, I still come out ahead. Well, a coworker who loves offshore fishing ordered a rain suit online, took one look at it, felt it and decided it wasn't sturdy enough for him. Then he gave it to me.

I haven't found how much it weighs, but here's the company's page for the jacket. And here's the pants .
Cost to me: Free!

Running total: $10.43
Posted by: Gershon

Re: Shoes and Rain Gear - 01/30/13 08:43 PM

I put a piece of Gorilla tape over the holes in the inside of the shoes. I'm about 800 miles into my 2,000 mile shoes now.

Nice job on the raingear.
Posted by: finallyME

Re: Shoes and Rain Gear - 01/31/13 09:22 AM

For my hiking shoes, I go to the cheaper sports stores and buy New Balance trail runners, generally in the $50 range, if not cheaper. New Balance fits me really well, so that is why I use that brand. Fit is more important than anything else in a shoe.
Posted by: 4evrplan

Re: Shoes and Rain Gear - 02/04/13 09:49 AM

A quick note about the shoes pictured above: I've replaced the laces with two layers of 3/16" flat elastic, cut to the right length and sewed instead of tied. They're still very comfortable, maybe even more so, because they have a bit more give when I need them too without sacrificing too much support. They're easier to get on and off. I don't have to worry about the laces coming untied; this is especially appreciated since my youngest son loves to play with them. And, they're much less likely to snag.
Posted by: 4evrplan

Re: Shoes and Rain Gear - 02/04/13 09:51 AM

Originally Posted By finallyME
For my hiking shoes, I go to the cheaper sports stores and buy New Balance trail runners, generally in the $50 range, if not cheaper. New Balance fits me really well, so that is why I use that brand. Fit is more important than anything else in a shoe.


I've owned several pair of NB shoes, but Adidas seem to fit my foot better.
Posted by: 4evrplan

Re: My Newbie Gear Log - 02/13/13 12:41 PM

As I noted in another thread, I have a Leatherman Wave multitool, but I decided it was a bit much to haul around backpacking. So, I bought a Leatherman Style PS instead.


It only weighs about 1.5 ounces and has all the tools I'm likely to need, short of a blade (for that I'll probably get one of the Mora of Sweden model knives, but I digress). To test it out, I've put my Wave up in a closet and have carried the Style exclusively for the past two weeks with great success. The tiny scissors are very sharp and work well. The combined flat/Philips screwdriver also works but is a bit thin. I could see it bending or breaking if trying to loosen a really tight screw or pry something. Hopefully that won't be an issue. The pliers also work very well and are fairly sturdy, but the tiny handle is a bit uncomfortable for anything but light pressure. Wrapping a bandana around it or using a glove should resolve the issue. The clip is secure, and I've used it to carry around on my key ring, which hangs on a belt loop via a carabiner instead of in my pocket (I can't stand bulk in my pockets), and I haven't worried about losing it.

Cost: $19.07

Running Total: $29.50
Posted by: 4evrplan

Re: My Newbie Gear Log - 01/16/14 03:33 PM

I've since replaced the multitool above with a Leathernam Squirt PS4. It has all the tools of the other one (except the clip) plus a blade, and it still only weighs 2 oz.
Posted by: jimmyb

Re: My Newbie Gear Log - 01/16/14 08:22 PM

Another way to finish some grips on to your hiking poles would be to hand stich some leather grips on similar to how they sew on a leather cover to a sailboat helm wheel.

https://www.youtube.com/watch?v=FHTuLV1L1tg

jimmyb
Posted by: 4evrplan

Tent - 02/08/14 06:47 PM

Here's my homemade tent. It still needs bug netting and zippers sewed onto the ends, but it's completely useable in it's current state, especially if I go before the bugs get bad. I could have gotten away with one guy line per end instead of two, but it's much more stable in wind this way.


The poles are just four sections borrowed from my other tent, so I couldn't cut them down or modify them too much. I've placed them on top of loose chunks of wood so they wouldn't sink into the ground and fill up with dirt.


Here you can see my homemade line tensioners that I cut out of a vinegar bottle. What you can't see is that they're doubled up. The plastic was really thin, so I made them redundant. If the line cuts through one, hopefully the other one will last long enough to get me home. I decided to put the tensioners on the tent side of the lines rather than down near the stakes where they'd get dirty, and I'd have to lean over to adjust them. You can also see the homemade washer I cut from another plastic container, which is permanently attached to the tent and fits over the pole.


This is another view of the pole-tent junction area. From this angle, you can see that I wrapped the pole tightly with cord to hold the tent up at the right height. the wrap is small enough that it still slips into the sleeve on my car camping tent.


The side pull-outs use a length of shock cord that I took out of the tent poles.


My first attempt at making stake loops failed. At first I thought the knots were coming unraveled because the line was so slippery, but on closer inspection, I saw that they were abraded through where the wind was making them rub against the stakes. So, I doubled up the loops and pushed the stakes all the way down, nearly underground, so there's no room for the cord loops to slide against them. So far, this is working much better.


Looking through the tent, you can see that it should have good ventilation, even once I get the bug-net doors up. The ground sheet is the thinnest painter's drop cloth I could find, 0.7 mil. I fully expect that I'll get holes in it, but it came 100 to a roll. There's also a CCF pad hidden somewhere under that huge sleeping bag.


Here's the poles, stakes, tent, ground sheet, and cords with my foot for comparison.


And here it is packed into a bread bag. My bathroom scale says it weighs two pounds all told, but it's only accurate to 1/2 a pound, so really it's between 1.5 and 2.5 pounds.


I've been working on this for a long time and haven't kept up with the exact costs, but I figure so far, the tent adds up to less than $40.

Total: ~$70

EDIT: I think it's between 1.75 and 2.25 pounds, since, outside of that range, my scale would have rounded up or down.
Posted by: rockchucker22

Re: Tent - 02/08/14 07:59 PM

Impressive, very nice job I like it!
Posted by: 4evrplan

Re: Tent - 08/04/14 10:12 AM

Since the last time I posted about my homemade shelter/tent, I've added no-see-um and a zipper. Sorry, no pictures yet. The materials were $18.20.

The cord I had wrapped around the poles to set the height eventually came undone. I have gorilla tape on them now, but unfortunately, that seems to be slipping down too. I'll have to figure out something else.

The line tensioners didn't work out. First off, when the lines were under tension, they were way too hard to adjust. You really have to have a bit of slack in them. Secondly, the line cut through them pretty quickly, I'd say after about four days worth of use. So, I removed the tensioners and have been adjusting the lines by moving the stakes. It's not as convenient, but it works fine. I also shortened the lines slightly, so they'd be closer to a 45 degree angle and not trip me up so much.

The other thing I learned is that the guy out loops and stake loops eventually will pull off if you don't sew through them! Both the clear duct tape and the gorilla tape do this. I haven't sewn through them all yet.

I've been thinking about moving the poles inward so they'd be co-planer with the bug netting. Since the netting has a set size, that's really where I need the pole to set the height of the tent in that spot. If/when I do that, I think I'll modify the beaks so they slope down slightly, to make sure rain doesn't run down the underside of them into the interior of the tent. I'll have to get new poles for that though. I need to anyway. I originally thought the thin fiberglass poles were going to be strong enough, but after testing them out more, they bend too much. I may just get some dowel rods and cut them to length.

Tent cost: ~$58
Total: ~$88

Buuut, as you know if you've been following my other threads, I just bought a factory made tent, the Eureka! Amari Pass 3. I may still use this homemade tent, depending on the circumstances of the trip, so I'm going to leave the costs added into my total for now. The new one was ~$160.

Total: ~$248
Posted by: CamperMom

Re: Tent - 08/13/14 01:01 PM

About the taped tie out attachments pulling free: How about making a "button" from a stiffer material to place on one side and wrapping the cord around it? A piece of balloon material should stop any slipping. Stitching can become a perforation line begging "tear here." The button approach might distribute pulling forces without adding a hole to your material.

I use old foam ear plugs as buttons to wrap elastic cord for my side pull outs on a mylar blanket slung under my hammocks as wind/rain/cold barriers. Works well for me and lasts for years. These are also moveable, if desired.


Best of Luck!

CamperMom
Posted by: 4evrplan

Re: Tent - 08/13/14 02:27 PM

Sounds like a good solution, CamperMom. Could you post a picture or two?
Posted by: Gershon

Re: Tent - 08/14/14 03:19 PM

In survival school we used small rocks or pine cones for buttons. Make a loop with a two half-hitch and push the button in one side of the material. Put the loop around it and pull it tight.

In survival school, we made tents out of a section of parachute. I think it was 4 panels, but I don't recall.
Posted by: topshot

Re: Tent - 09/01/14 07:12 PM

Originally Posted By 4evrplan
The other thing I learned is that the guy out loops and stake loops eventually will pull off if you don't sew through them! Both the clear duct tape and the gorilla tape do this.

Odd. I've never had a problem with the tape coming off THIS material. From my polycryo tent, yes. Speaking of which, I'd highly recommend that over the painter's cloth for a groundsheet. It's lighter and stronger. May be hard to come by in TX but you can order the window shrink film kits online.

You also don't need line tensioners - taut line hitch FTW!
Posted by: 4evrplan

Re: Tent - 09/02/14 03:27 PM

Originally Posted By topshot
Odd. I've never had a problem with the tape coming off THIS material. From my polycryo tent, yes. Speaking of which, I'd highly recommend that over the painter's cloth for a groundsheet. It's lighter and stronger. May be hard to come by in TX but you can order the window shrink film kits online.

It's not hard to find here at all. I just can't justify buying another ground sheet right now when I've already bought a ten pack of the drop cloth.

Originally Posted By topshot
You also don't need line tensioners - taut line hitch FTW!

The tautline hitch doesn't work with the line I have (catfish drop line). It's too thin and slippery. I'd use the trucker's hitch (been using it since high school to haul stuff around in my pickup truck), but I haven't got around to it yet. It's probably overkill anyway; moving the stake works just fine.

I think if I were to do this all over again, I'd just use cheap 3 mil PE (or polycryo if I felt like going to the trouble of reinforcing the edges) and tie off with sheet bends instead of messing with guy loops or grommets. I'd just use a found stick for support and hang a homemade bug bivy from the ridgeline and call it good. Simple. Extremely light. Extremely cheap.
Posted by: topshot

Re: Tent - 09/02/14 03:49 PM

Originally Posted By 4evrplan
The tautline hitch doesn't work with the line I have (catfish drop line).

It worked for me but it may be the catfish drop line I had used is different than your's.

Originally Posted By 4evrplan
I think if I were to do this all over again, I'd just use cheap 3 mil PE (or polycryo if I felt like going to the trouble of reinforcing the edges) and tie off with sheet bends instead of messing with guy loops or grommets.

Sure wouldn't look pretty though. smile Don't think it would hold up near as well in bad weather either but maybe I'm wrong. You'd still need to reinforce the edges, too, if you were going to experience any wind. Any kind of PE will stretch AFAIK.